
|
||||||||||
| -I | O | I | II | III | IV | V | VI | VII | VIII | IX |
Real-World RAW Workflow Calibration
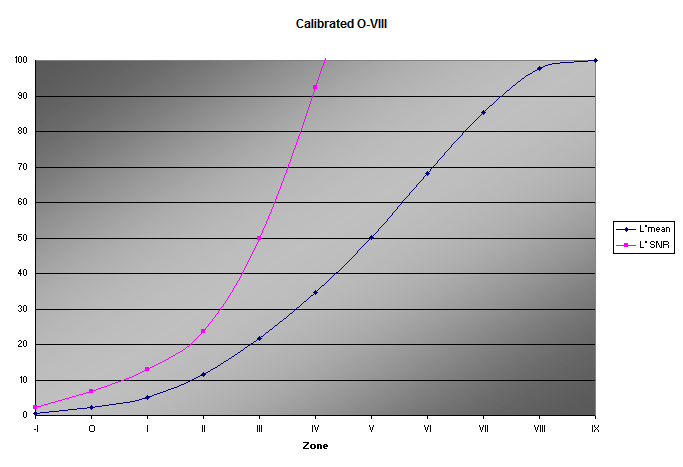
The preceding analysis pages primarily dealt with system characterization: what are the tonal limits of the system and how does it respond to the available controls. This knowledge can be used to determine processing settings that result in predetermined zone placements: system calibration. What Ansel Adams, Minor White, and Phil Davis did with negatives, I would like to be able to do with digital captures.
For example, zeroing all the controls with the Nikon D700 results in a zone V that falls a little short of middle gray, and a zone VIII that is blown to white. Can we find settings that put zone V onto an L* of 50, and zone VIII onto our chosen highlight threshold of 98? And what if we use a slightly more real-world contrast curve setting of, say, medium? To do this, I first used Photoshop to determine the RGB values that correspond to L* values of 2, 50, and 98, this time using ProPhoto RGB:
| L* | ProPhoto RGB |
| 2 | 8.9 |
| 50 | 100.0 |
| 98 | 248.3 |
I then opened the Nikon exposure series images with Adobe Camera Raw in the ProPhoto RGB color space. After zeroing the controls, this time with a medium contrast curve, I used the color sampler to measure zones O, V, and VIII, and adjusted the Blacks, Brightness, and Exposure sliders until each zone had the appropriate tonal value. The settings, and the resulting zone ruler and graph:
| Exposure | -0.69 |
| Brightness | +46 |
| Blacks | 1 |
|
|
||||||||||
| -I | O | I | II | III | IV | V | VI | VII | VIII | IX |
For more snap with a low-contrast subject, the dynamic range can be reduced to I-VII, similar to that of .jpg captures:
| Exposure | +0.58 |
| Brightness | -16 |
| Blacks | 5 |

|
||||||||||
| O | I | II | III | IV | V | VI | VII | VIII | ||

It is clear from analysis of the digital response curve that highlights have a discrete limit, but shadows taper off gradually. This tends to result in a shorter highlight curve than film photographers are used to; zone V is “off-center” toward the high end. Is there any way to extend the effective highlight curve? One rather drastic way is to define zone IV, one stop below the meter reading, as middle gray, and then to adjust the processing controls, not the camera exposure, to raise zone IV to a value of 50. The maximum Brightness of +150 was not quite sufficient, so I also raised the Darks parametric curve slider to +11:
| Exposure | -1.94 |
| Brightness | +150 |
| Blacks | 2 |
| Darks | +11 |

|
||||||||||
| -I | O | I | II | III | IV | V | VI | VII | VIII | IX |
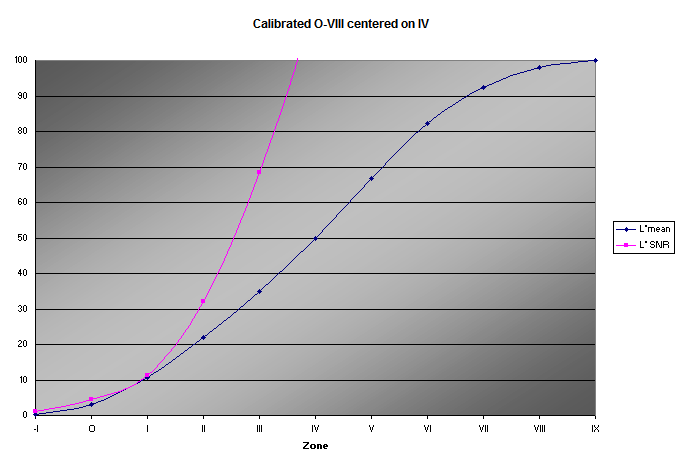
Redefining zone IV as middle gray is equivalent to a one-stop underexposure with “push processing.” Film photographers are used to determining their own effective film speeds; but changing a digital camera’s ISO speed cannot be used to compensate for exposure because it changes the camera’s response. Using a handheld meter, one could double the effective ISO speed (on the meter, not the camera), and the effective dynamic range becomes I to IX (just like film!). Or one could just incorporate a Brightness increase into the workflow and assume that the image’s midtones will be brighter than they normally would.
The advantage to using zone IV as middle gray like this is smoother highlights; the disadvantage is the possibility of noisier shadows.
Below are two zone rulers of the north sky. The first was processed normally, the second with “push processing.” They are offset to show the longer highlight scale of the second:
| IV | V | VI | VII | VIII | IX | |

|
||||||

|
||||||
| IV | V | VI | VII | VIII | IX | |