An Introduction to Photo Editing with PhotoLine: Luminance Curves
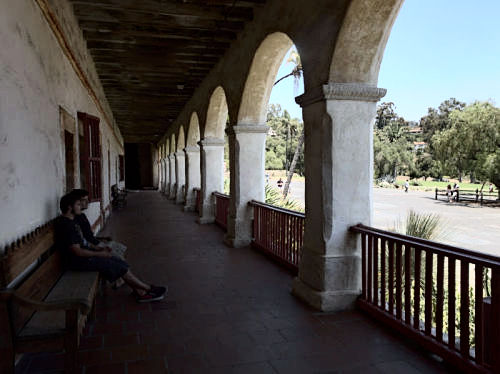
We are going to create our first adjustment layer, and use it to adjust the luminance of the image.
To create a Curves adjustment layer: Layer – New Adjustment Layer – Curves.
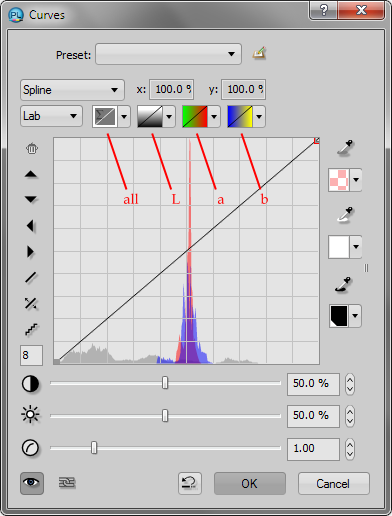
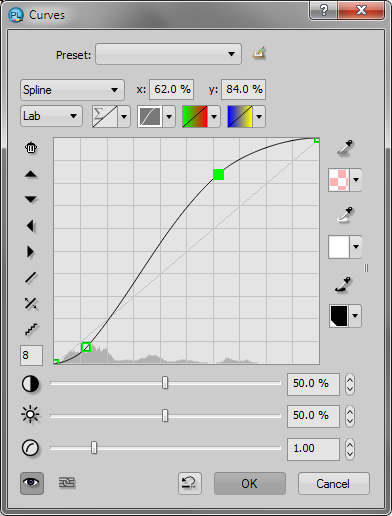
The default “curve” is the original RGB vs. the changed RGB. It is a straight line from the origin (black) to the upper right corner (white) because nothing has been changed. Click the color mode dropdown and change it from RGB to Lab. Now click the second of the four curve control icons (the L channel, technically “Lightness,” whose icon is a gradient from white to black) to select it. This will let us adjust luminance without affecting the color.
|
|
Now click a point on the curve, hold the mouse button down, move the mouse around, and watch what happens. Raising a point on the curve lightens the image; lowering it darkens the image. Note that you can adjust a point near the bottom to emphasize lightening or darkening the shadows, or a point near the top to similarly adjust the highlights.
The default curve type is called Spline; I believe that the names of this one and the Bezier curve are reversed, but I am told that it is arbitrary. At any rate, the one called Spline is probably the most useful.
New in version 21, the Curves dialog and its contents are resizable.
To see the before and after images, turn the preview off and on (the eye icon at the bottom left). The adjustment dialogs open with a split before-and-after preview by default. I find the split preview disturbing; it may be hidden by dragging the little handle to the left of the image, or by shrinking the dialog horizontally. To show it again, the dialog must be enlarged to a sufficient size. You can also drag the preview “curtain” with the little arrowhead at the top of the preview to undo the split if you want, but I prefer to just look at the original image and toggle the view with the eye icon. (For future reference, dialogs which are not adjustment layers have small double arrows to the left of the preview which show or hide it.)
To undo all the changes to the curve, you may click the arrow on the L curve control and choose the first (straight) curve; unfortunately this also changes the curve type from Spline to Bezier and you have to change it back. You may also delete points on the curve by dragging them off the graph (the easiest way), or by clicking the little garbage can icon at the top of the tool set on the left side of the dialog. The reset button beside the OK button resets everything, including the color mode to the default RGB.
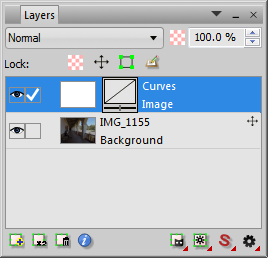
Go ahead and click OK. The dialog closes, but now there is a new layer in the Layers panel (whether you adjusted anything or not). Each layer has its own eye icon that shows or hides the layer. And the opacity of each layer (other than Background) may be adjusted by raising or lowering the percentage beside the blend mode. (Note that the opacity can be greater than 100%; this comes in handy when you would like to increase the effect of a complicated adjustment.) The checkmark indicates that the layer is the active layer for editing. You may double-click the name of the layer (it is Curves by default) and rename it to something like “foreground shadows”; this comes in handy when your image has a large number of layers.
Turn the layer handles off if necessary via View – Show Layer Handles.
 |
Now double-click the curves icon on the new layer (beside the name) to reopen the Curves dialog. Select the L channel as above. Click a relatively dark area (not black) on the image and a point will be added near the bottom of the graph. Now click a light area (not white) and another point will be added near the top. Click the lower point on the graph and drag it down a little; similarly drag the higher point up to make an S-shaped curve. What you just did was to increase the overall contrast of the image. Toggle the preview off and on to see the effect (or roll your mouse over the image below.) Notice that the slope of the curve increased along the middle; increased slope means increased contrast. But the slope cannot increase everywhere; if it increases in the middle, it has to decrease near the ends. This is why the dark areas of the image are all turning black, and the light areas turning white; contrast is being lost in those areas.
|
 |
To decrease the overall contrast, raise the low point of the curve, and lower the high point. Most of the image will start to turn flat and dull. But note that the details in the highlights and shadows may become more visible, because contrast is increasing in those areas.
Using curves gives you much more control over the image than traditional brightness and contrast adjustments. (They are there on the Curves dialog; ignore them.) With curves, you can raise or lower the luminance and contrast in whatever region of the image scale you want, such as deep shadows, all the highlights above the middle, and so forth. More on this later.
Other modes that are intended to adjust luminance only include the I channel of HIS (Hue, Intensity, Saturation), the V channel of HSV (Hue, Saturation, Value, the latter sometimes called B for brightness), and the combined RGB channels (the default) with the blend mode set to Luminance in the Layers panel. The L channel is just as easy as the others, and is the most perceptually accurate as it was designed to correspond to human vision.
(Side note: if you click the Group With Previous Layer button beside the eye icon on the Curves panel, you will have to unclick it next time, or from then on ALL of your adjustment layers will be grouped below the previous layer.)
Next: layer masks