
|
||||||||||
| -I | O | I | II | III | IV | V | VI | VII | VIII | IX |
Simplified Zone System Calibration for RAW Images with RawTherapee
Find the extremes
A simple method of using RawTherapee to measure an exposure series of RAW images consists of merely adjusting the Exposure compensation and Black levels to see where the highlights clip and the shadows fall off. This method is low-tech but yields results comparable to those on the previous calibration pages. The goal is just to see how many useful zones are recorded in the RAW image.
First, set all of the images in the series to the same Exposure values; zeroing everything on the Exposure tab works best.
Then start with the highlight images. Find the Exposure compensation value where L* goes to 100. Above a certain point (zone X in this series), the value will be the same for all images; below this it starts to rise as you can see:
| EC, clipped to L* = 100 | |
| XI | -0.52 |
| X | -0.52 |
| IX | -0.47 |
| VIII | -0.05 |
| VII | 0.95 |
Zone IX is very close to the highlight limit. We would like a little more separation in the highlights than this, so zone VIII is the extent to which meaningful highlight information is recorded.
Now for the shadows. Adjust the Black level to place L* on 2. (It is easy to place them all on 0; pulling the lowest zones up to 2 takes some effort.) Once again, there is a point at which the values sharply drop off; zone O is thus the lowest useful shadow zone.
| Black, set to L* = 2 | |
| II | 900 |
| I | 370 |
| O | 120 |
| -I | -2200 |
| -II | -15000 |
With .jpg or .tif captures, constructing a zone ruler to determine the useful dynamic range is fairly straightforward. RAW conversion adds another set of variables to the process. The method above is a simple way to determine how many useful zones are recorded in the RAW image.
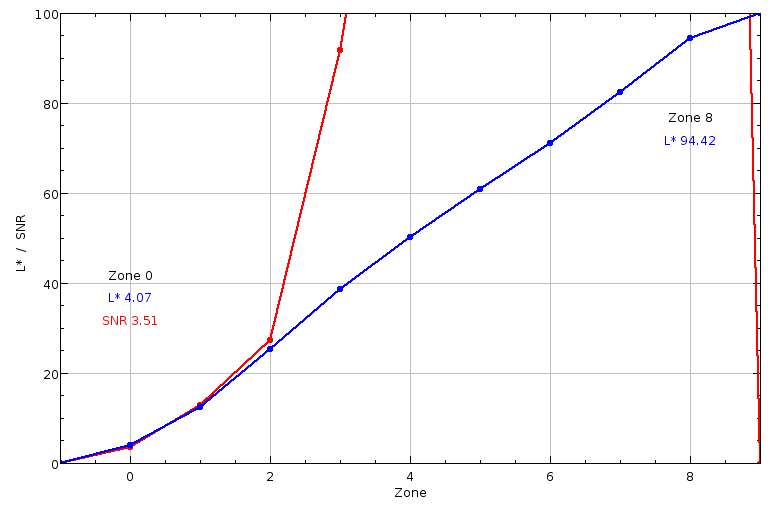
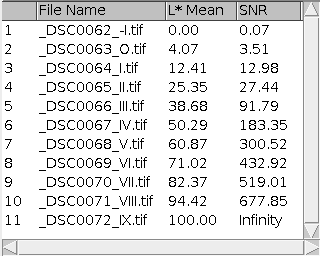
Zone IV on middle gray, extremes at 0 and 100
Having determined the extremes as above, I used RawTherapee’s Exposure compensation, Black, and L*a*b* Lightness controls to place zones -I and IX on L* = 0 and 100, and zone IV on L* = 50 (middle gray) as described on previous pages. Setting the extremes to 0 and 100 is similar to using the clipped highlight and shadow indicators with an actual image. (You can set the thresholds to 0 and 255 in Preferences.) Zone IV falls on the midpoint of a nice smooth gradient; but elevating the midtones like this increases the signal-to-noise ratio in the shadows.
The results were analyzed with ImageJ using the Color Transformer 2 and BTDZS Zone Ruler plugins (from the Color Transformer page).
Given these results, during exposure one would place detailed highlights on zone VII, and detailed shadows on zone I or higher. When processing the images, one would simply start with L*a*b* Lightness at 47, then set the highlights and shadows to 0 and 255. Lightness and other parameters may then be adjusted to taste. A more conventional zone V middle gray calls for a Lightness of 27; of course everything is a little darker.
| Exposure compensation | -0.47 |
| Black | 120 |
| L*a*b* Lightness | 47 |
|
|
||||||||||
| -I | O | I | II | III | IV | V | VI | VII | VIII | IX |
RawTherapee 5
