|
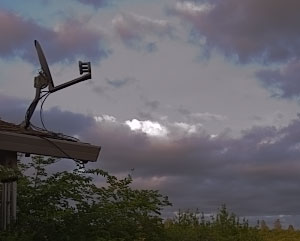 What it’s “supposed” to look like |
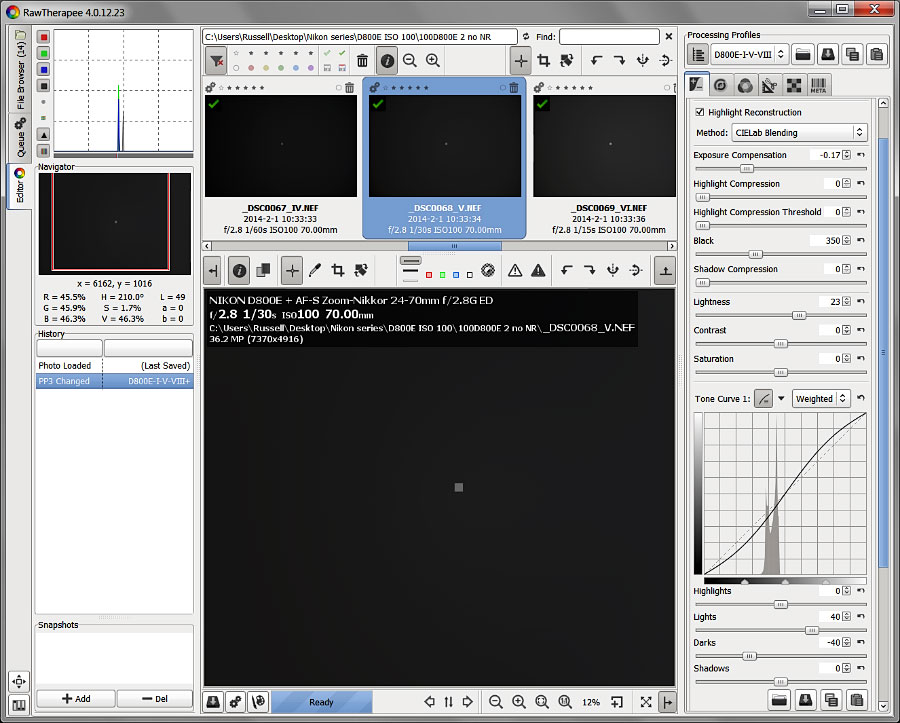
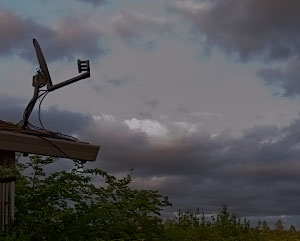 What it looks like in RawTherapee |
Nikon D800E Calibration with RawTherapee
If you have not used the RAW converter RawTherapee lately, you have missed out. I have been watching it since version 2; and I think it is safe to say that, as of version 4.1, it has “arrived.” In some ways it is the most advanced RAW converter out there; and best of all, it is open source freeware. I believe that it is the only converter besides Adobe Camera Raw/Lightroom and Rawstudio that uses ColorChecker Passport DNG profiles. And now it even has a wiki!
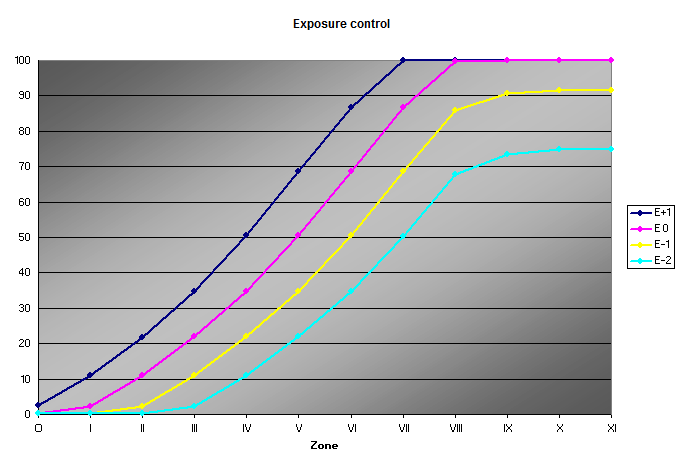
Raw Therapee differes from ACR in one important way, which requires a slightly different calibration technique. Negative values of the Exposure Compensation control depress the entire top end of the curve, degrading all whites to gray. Also important to note is that the behavior of Exposure Compensation depends on whether or not Highlight Reconstruction is enabled, even if Highlight Compression (formerly Highlight Recovery) is zero. If HR is not enabled, the highlights are completely flattened when exposure goes below zero, and it is impossible to separate zone VIII from zone IX. The graph below is from version 4.1.1, with HR enabled. Roll your mouse over it to see the effect of disabling HR. (Try a rhumba rhythm.)
|
|
What it’s “supposed” to look like |
|
What it looks like in RawTherapee |
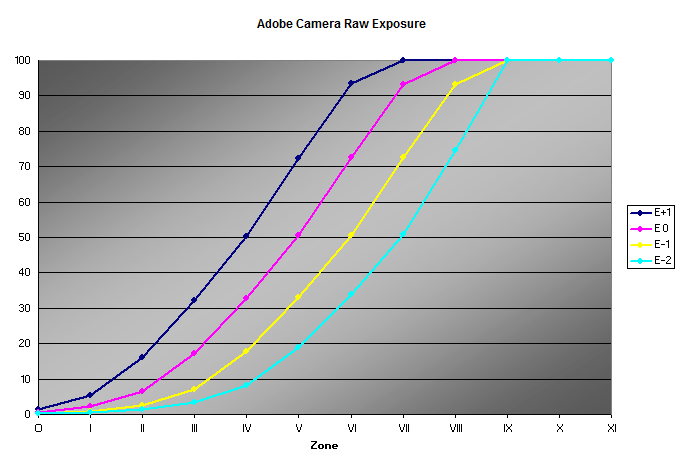
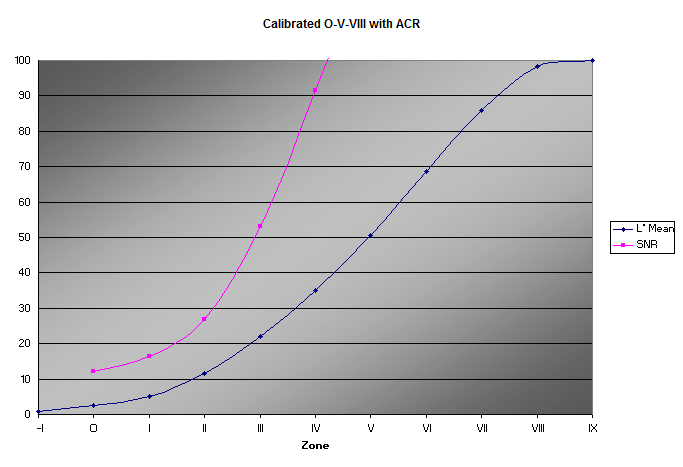
For comparison, here are Adobe Camera Raw’s handling of highlights at different exposure settings. ACR’s highlights are not depressed at negative exposure values, but stay fixed at the top. It is as if ACR slides the entire curve right and left, preserving the highlights; RT drags the entire curve, including the highlights, up and down, and so degrades them at some point.
Another important feature of RawTherapee is that the Contrast control is dynamic, meaning that it applies a contrast curve centered on the average luminance level of each individual image. So when applied to the images in a zone series, it does basically nothing. Calibration adjustments must be predictable and repeatable, so I use a parametric tone curve to apply a “medium” contrast adjustment.
The image value measurement is the 0-100 brightness value (V, sometimes called B), not 0-255 RGB values as in ACR. More importantly, the L* value is given as well, and as of version 4.0.12.132 it appears to be accurate (and displayed to one decimal place). This is invaluable when making calibration adjustments.
Because of how RawTherapee’s exposure control works, it is useful to know the magic point at which the highlights peg at the top. This point depends on the highlight reconstruction method and the white balance. The latter, unfortunately, makes it a moving target. For broad overexposed areas such as sky, the Blend HR method may work best. With this method, the highlight clip point comes at a fairly low exposure compensation value, and if low enough, can be ignored. For small blown points such as on a person’s nose, CIELab Blending may be better; but the clip point is higher. For the following examples, I decided to find the exposure control clip point and just leave it there. Lightness and Black were then used to adjust zone V and the shadow threshold. A little bit of control over the highlight threshold is given up this way, but it seems to be workable. For the D800E images, zone IX has a tiny amount of recoverable value, but it is not really useable, so I chose this as the highlight. An Exposure Compensation of -0.27 put zone IX right at L* = 100.
(If necessary, exposure could be reduced further, and a curve applied to lift the degraded highlights back to white. It works well for individual images, and is the kind of thing I would probably do in Photoshop. I am trying to keep the system calibration tools simple and reproducible, being as they are a controlled standard for zone system visualization, and a baseline for further adjustment.)
I used the following settings to place zone O on 2 and V on 50. Everything else was zeroed, especially Sharpening and Noise Reduction.
| HR method | CIELab |
| Exposure | -0.27 |
| Black | 110 |
| Lab Lightness | 23 |
| Lab L Curve | +40/-40 |
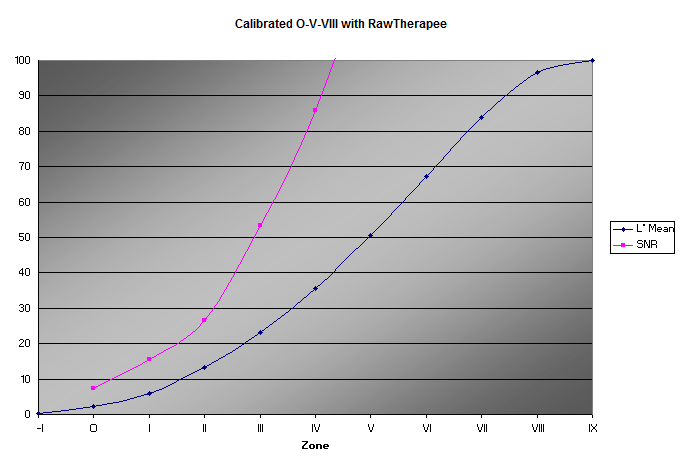
Comparing these results with those using Adobe Camera Raw on the same images (below), one difference is that RawTherapee’s highlight threshold (zone VIII) fell on L* = 96.7. Exposure could be increased to move the value up to 98 if desired; it just can’t be decreased without degrading the highlights. Another difference is a slightly greater amount of noise at the low end using RawTherapee; but it is still very good at 7.3. The program offers a choice of nine demosaicing algorithms; none of them provides a dramatic increase in SNR over the default AMaZE.
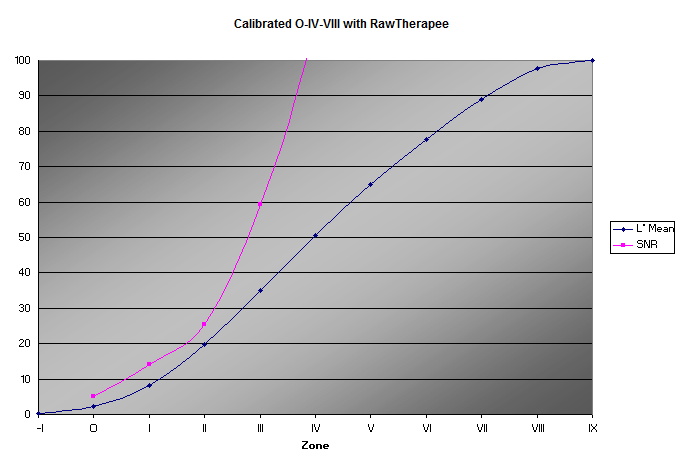
What about placing zone IV on middle gray to balance the values and extend the highlight scale, as described on the calibration page? Using ACR, this required a steep reduction in the expsure value, to almost -2. With RawTherapee, I left the exposure where it was above, and made similar adjustments to Lightness and Black to place zone IV on 50. Zone VIII rose to 97.8, and the overall curve has a little more of a hump to it.
| HR method | CIELab |
| Exposure | -0.27 |
| Black | 150 |
| Lab Lightness | 44 |
| Lab L Curve | +40/-40 |
Finally, I notice some pink in RawTherapee’s highlights. This can be eliminated by raising the White Point Correction, in Raw White & Black Points under the Raw tab, to 1.04.
| RawTherapee |

|
||||||||||
| Adobe Camera Raw |

|
||||||||||
| -I | O | I | II | III | IV | V | VI | VII | VIII | IX | |
Overall, with the exception of Exposure Compensation, I like RawTherapee’s controls better than Adobe Camera Raw’s. RT’s Black, in particular, gives a much greater degree of control over the shadows; and the Lightness controls seem to be more manageable. The Lab adjustments, especially the CC curve for saturation, are invaluable. And I love that parametric crop; it comes in very handy when making a zone series. Because of the degree of control they offer over the tonal scale, and the fact that they both use ColorChecker Passport profiles, I consider them to be each other’s only serious competition.
A note about pink highlights: these may be eliminated by raising the White Point Correction as mentioned above. Per the documentation in the camconst.json file, dcraw (RT’s raw parser) is rather liberal with the white point, while Adobe’s software is much more conservative. The latter makes pink highlights unlikely but may reduce the dynamic range a little more than necessary. The easiest way to find the correct white point is to shoot a fully overexposed neutral surface; zone X in an exposure series like the ones above should do. Open it in RT, turn off Highlight Reconstruction, and set Exposure Compensation to about -2. Now measure the a and b values of the highlight exposure. They will probably be positive and negative, respectively, if the image has a pink tint. Go to the White Point Correction control and gradually raise the white point until a and b are both as close to zero as they get. The white point is now neutralized, and this value can be incorporated into the processing profile. Be sure to do this before making any other adjustments. As noted in camconst.json, some cameras scale the raw values for large apertures, so it is best to do this test at f/5.6 or smaller. With the Nikon D800E, the White Point Correction value is 1.03 at f/2.8, and 1.04 at small apertures, so I just use the latter. It represents the loss of something like 1/18th of a stop of dynamic range.
ImageJ
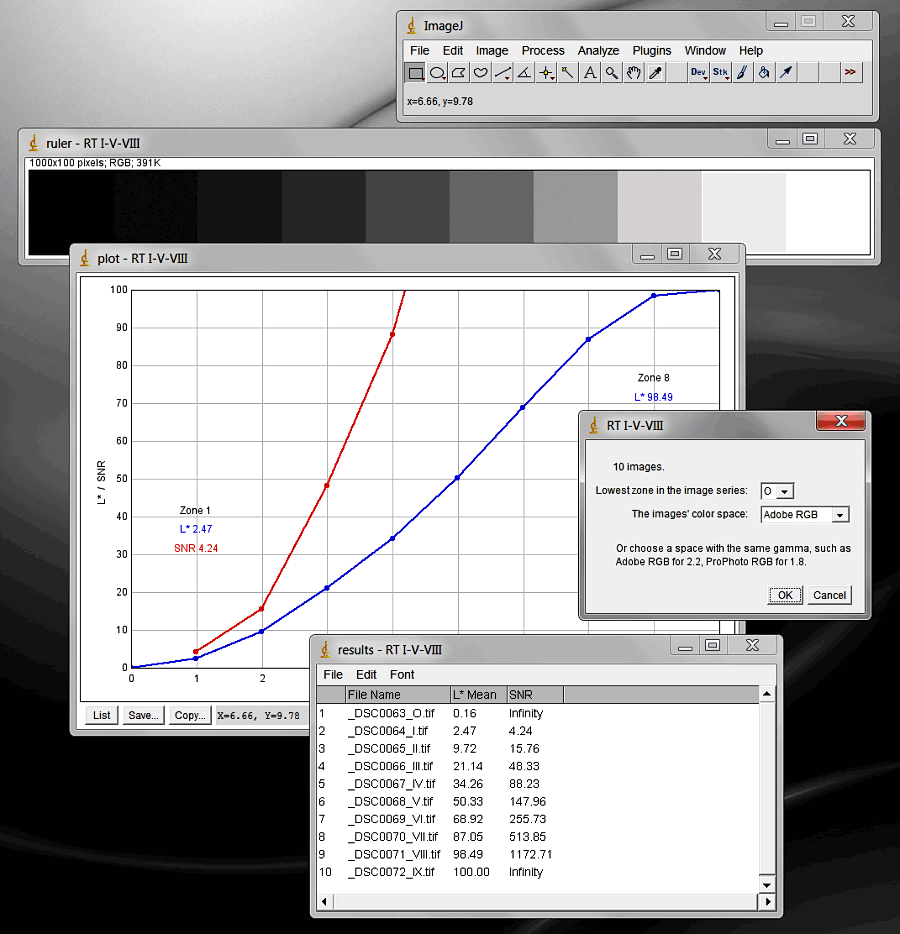
I measured the RawTherapee zone images using ImageJ, a quirky little utilitarian Java-based program which is also open-source freeware, and can be fully automated with macros and plugins. I modified the plugin Color Transformer so that images may be converted to L*a*b* for measurement from a number of different color spaces including Adobe RGB and ProPhoto RGB. With small-gamut images like those of a zone series, it is the gamma that is most important. I also wrote the BTDZS Zone Ruler macro for ImageJ (link on the Color Transformer page above) that automatically measures all the zone images in a folder, displays their values in spreadsheet form, and constructs a zone ruler. Updated 2/22/2014, the macro now displays a simple plot of the values:
Freeware spreadsheet program for graphing the results above: LibreOffice (the spreadsheet is called Calc). A successor to OpenOffice.org.
p.s. A few more creative-cloud-free apps:
PhotoLine (buy a permanent license for €59). Does some things the creative cloud can’t do, such as saturation and L*a*b* curves in an RGB image, and adjustment layers for adjustment layers. Much more advanced in general than Corel’s excellent programs. Uses creative cloud plugins.
SNS-HDR, the best software in existence for photo-realistic HDR generation. Version 2 is now available, and the website is now in English. The command line version is free, and works amazingly well:
Next: Lightroom