The Fujifilm EXR Sensor
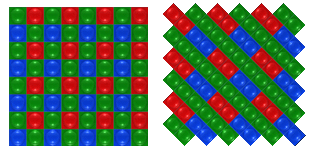
The Fujifilm EXR sensor is the descendant of the Super CCD, which used two different sizes of interspersed octagonal pixels to capture a wider dynamic range than is possible with an array of conventional pixels. The EXR array uses conventional pixels, but they are rotated 45° and arranged in pairs so that they can behave like the Super CCD by operating at different sensitivity levels (Wide Dynamic Range, or DR mode). They can also be “binned” to act in pairs like one larger pixel which has greater sensitivity and less noise (High Sensitivity & Low Noise, or SN mode). Unfortunately for zone system photographers, current cameras do not permit manual exposure when using most of the advanced features of the EXR sensor. Additionally, DR mode dynamically combines high and low-sensitivity exposures to create an HDR (high dynamic range) image, and thus has no fixed, inherent tonal scale. (“The EXR CMOS sensor adjusts its complex electronic behavior for each situation,” according to fujifilm.com/about/features/exr/; see also EXR Technology: Wide Dynamic Range.)
Nevertheless, the concepts are intriguing, and I am all for innovation, so I thought I would try to make what observations and perform what tests I could. I used a FinePix HS30EXR that I bought on KEH.com for this very purpose, and processed the raw exposures with Adobe Camera Raw 6.7. As in previous tests, I used a medium contrast curve and only adjusted the exposure, blacks, brightness, and darks if necessary; no sharpening or noise reduction was performed. I also set the white balance, and used a camera profile created with ColorChecker Passport, which had no trouble using the .dng file created with the Adobe DNG Converter.
Low-level dynamic range increase and “push processing”
One option that is available in manual exposure mode, which unfortunately is not well explained in the documentation, is intended to be a two-stop (up to 400%) increase in dynamic range by “increasing sensitivity through signal processing, adjusting shadow gradation, softening highlights, and depicting an optimal curve.” To use this mode, one must first increase the camera’s ISO speed from 100 to at least 200 for a 200% DR increase, or at least 400 for a 400% increase; then set the dynamic range control accordingly. The camera then evidently pre-processes the raw data to yield a wider range of acceptable values. To sum up the results of the measurements below, I have found that the same effect can be obtained, with a lot less noise, by shooting at ISO 100 and push-processing the raw file.
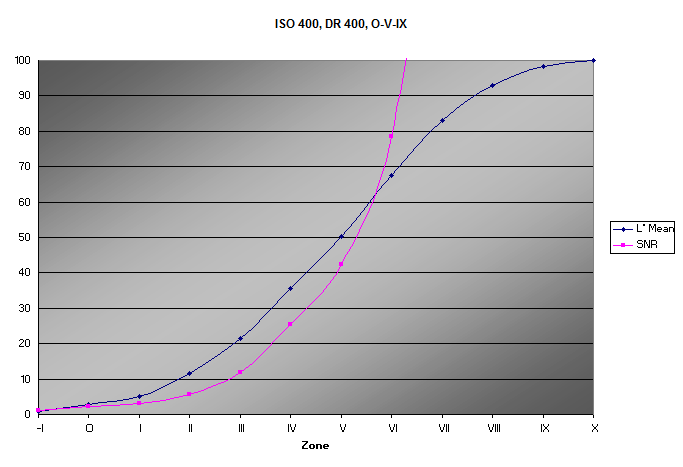
Here is the graph of a zone series shot using ISO 400 with a DR increase of 400%, processed like high-quality raw files with shadow and highlight thresholds on zones O and VIII. The value curve looks pretty conventional. Unfortunately, the signal-to-noise ratio is poor. At zone O, the shadow threshold, the SNR is 1.8, acceptable being about 4. Moreover, at zone III it is only 11, when it should be in the 40 range.
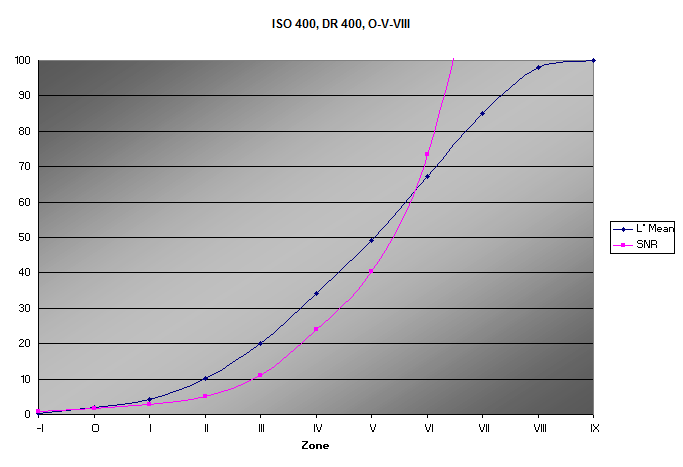
Reprocessing to raise the shadow threshold to zone I doesn’t help:
However, there is one advantage to be gained by using this method: the highlight threshold can be increased to zone IX without difficulty. (Zone X is still blown to pure white.)
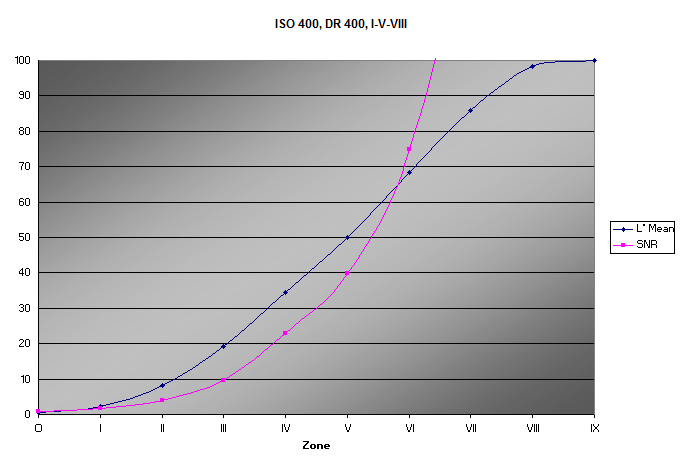
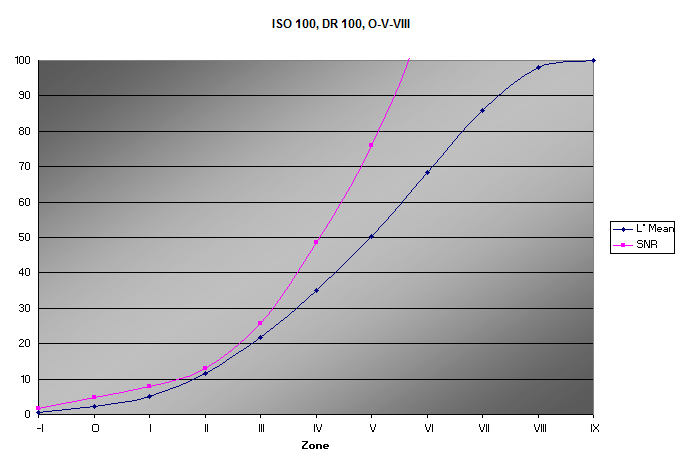
How does the above compare to a conventional series using ISO 100, and a DR of 100% (in other words, normal)? The shadow SNR is now an acceptable 4.8, and at zone III it is a much better 26.
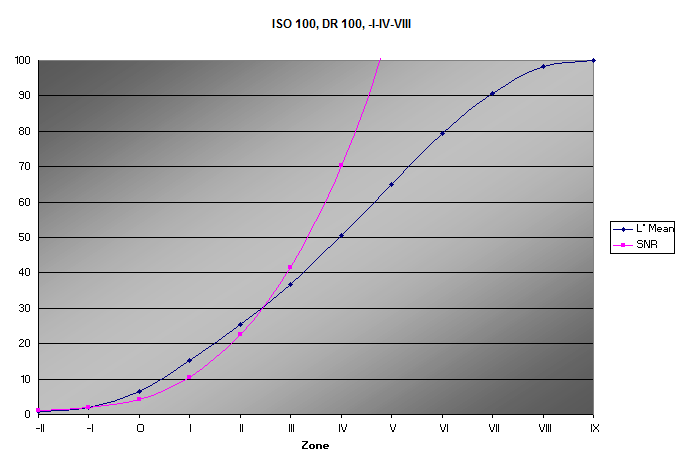
All one has to do to get the same dynamic range as the low-level increase above is to underexpose then push-process to place zone IV on middle gray, as described on the calibration page. The graph below is almost identical to the one labeled ISO 400, DR 400, O-V-IX, except that the values are all shifted down one zone (and the noise is better). This allows a value placed on zone VIII to have the same relationship to the lower values as zone IX did above. (This may sound confusing; below is an example of what I mean.)
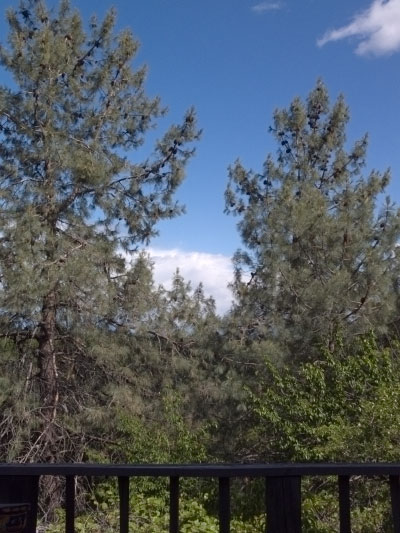
Here is an image exposed at ISO 400, DR 400%. The clouds were placed on zone VIII, just below threshold, and the trees on the distant hill fell on zone IV. Exposure was 1/500 @ f/9. Processing was done with the same parameters as the ISO 400, DR 400, O-V-IX series above. (I also added a little vibrance to these images.)
Here is the same scene, exposed at ISO 100, DR 100%. This time the clouds were placed on zone VII, because the highlight threshold is now one stop lower, and the trees fell on zone III. Exposure was 1/250 @ f/9 (only one stop more than the above). But the raw image was push-processed to raise zone IV to middle gray using the same parameters used above, and so the trees have about the same value as they did in the previous image. It is virtually the same image, with slightly less local contrast and a tiny bit more detail in the clouds.
Here are details at actual pixel size; the increased noise at ISO 400 is obvious.
Of course, if you needed to expose at ISO 400 for some other reason, you could do so at DR 100% and similarly push-process to get yet another stop of highlight dynamic range if you wanted to. The exposures above would have actually matched if I had push processed an image exposed at ISO 200. It would be interesting to see how the noise levels compare in these situations; I will leave it to you as an exercise.
Bottom line: you can do yourself what the EXR processor does to get the low-level dynamic range increase, and with a lot less noise besides.
EXR mode with D-range priority
Here is where things get interesting. Shooting in EXR mode with D-range priority, the DR mode described above, causes the camera to make two separate exposures: one at low sensitivity using one member of each pixel pair, and another at high sensitivity using the other member of the pair. These images are combined into an HDR image, the way you would if you took two separate exposures and combined them using HDR software (and could then convert them back into a “raw” file). One advantage to the EXR method is that the images are captured simultaneously, and are suitable for moving subjects. On the downside, each image has only half the resolution of the full sensor; and, according to the documentation above, the camera combines this method with the previous method of low-level DR increase, and the resulting noise is evident. The total DR increase can be up to 1600% (4 stops).
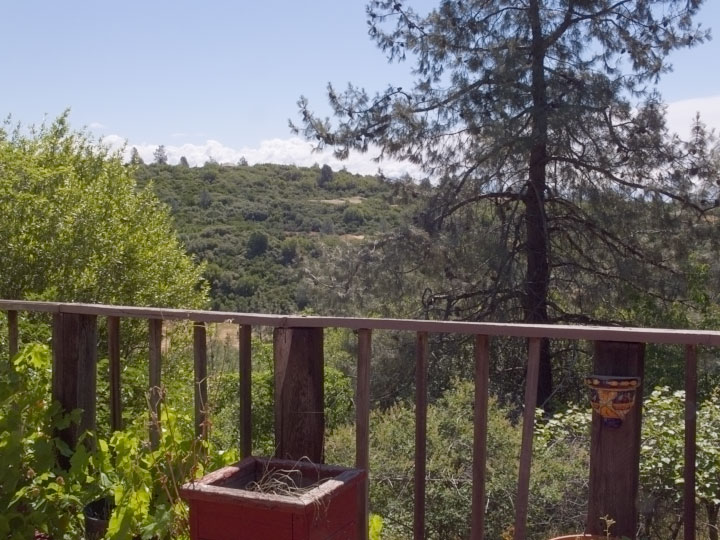
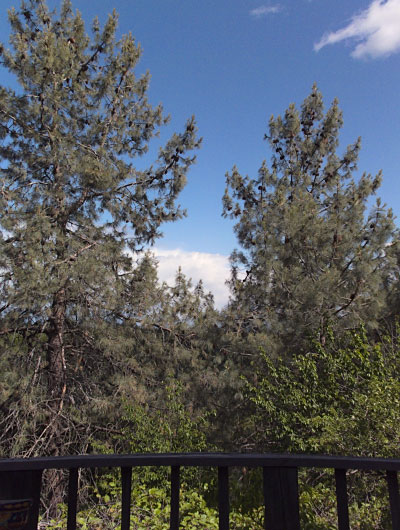
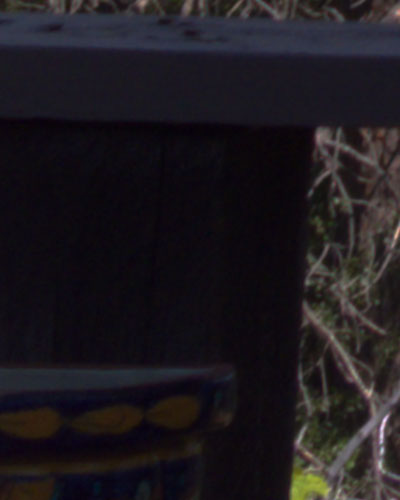
Since the camera does not permit manual exposure in EXR mode, I just made a few exposures using what controls are available: namely, metering with exposure compensation. In the scene below, placing the upper sky on zone VII causes the clouds to fall on zone IX, and the dark wood of the railing on zone I. The first image was taken using EXR mode, ISO 400 (it is actually auto ISO up to the specified value; the exif data did indicate an ISO of 400, which was consistent with actual metered values). Dynamic range was set at 1600%. The upper sky was placed on zone VII by metering it with exposure compensation of +2 stops. The second image was taken at ISO 100, DR 100%; exposure was set manually to be equivalent to that of the previous image, a two-stop increase at the lower ISO.
| ISO 400, DR 1600%: | ISO 100, DR 100%: |
 |
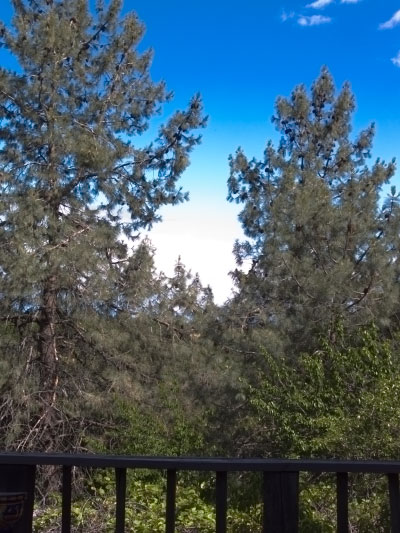 |
The EXR image retains plenty of value in the zone IX clouds. Using Adobe Camera Raw, I reduced the exposure until there was no more pure white in the clouds. The resulting exposure was -0.25; there was a long way to go, meaning that they were not anywhere near threshold.
The clouds in the second image are blown, being as they are completely above the highlight threshold. The exposure setting for this image was -4.0, as low as it gets, which accounts for the somewhat bizarre colors. Brightness was adjusted for each image to make the trees look similar; blacks for both images is 2, and the resulting shadow values are virtually the same.
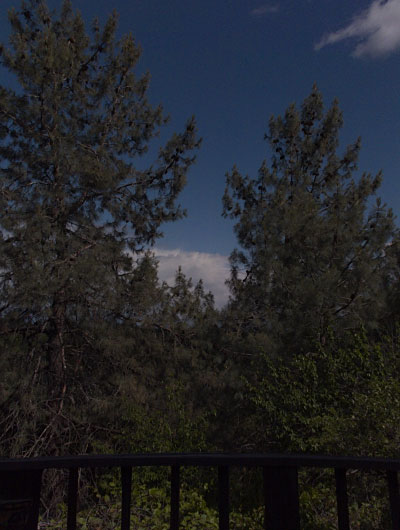
I originally concluded that the EXR method provides additional dynamic range in the highlights by combining an underexposed image with the one taken using the indicated settings. But RawTherapee 5.1 is able to process any sub-image from raw formats which support multiple images, including Fujifilm EXR images. (Select the sub-image on the Raw tab under Demosaicing.) Below are the sub-images from the EXR exposure above. Note that sub-image 1 is simply a straight exposure, apparently with no exposure compensation applied; it looks as if the upper sky was placed on zone V, and the clouds fell on zone VII. Sub-image 2 is in fact an underexposed version of the former. Further work is needed . . . .
| ISO 400, DR 1600%, sub-image 1: | ISO 400, DR 1600%, sub-image 2: |
 |
 |
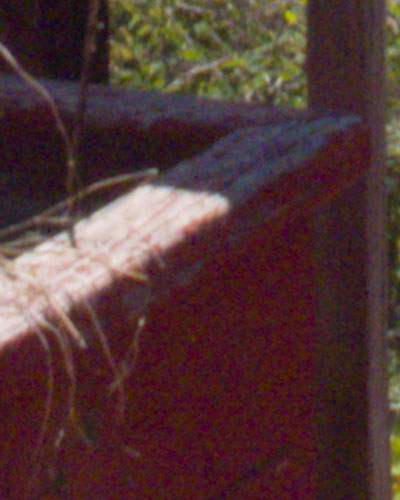
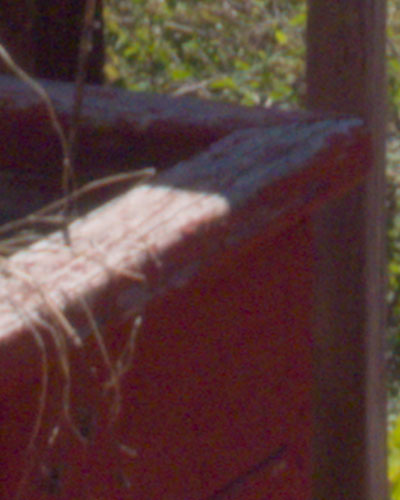
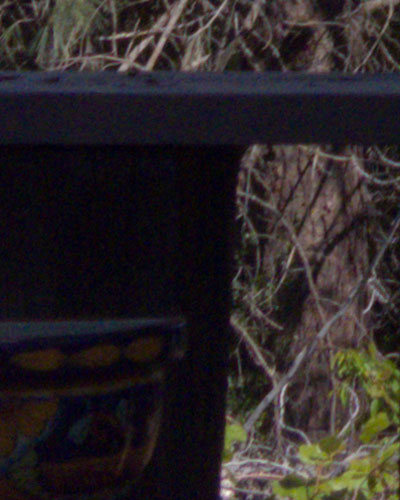
Finally, here are details at actual pixel size, illustrating the increased noise in the EXR mode image. It also looks like it has been sharpened.
Off-topic
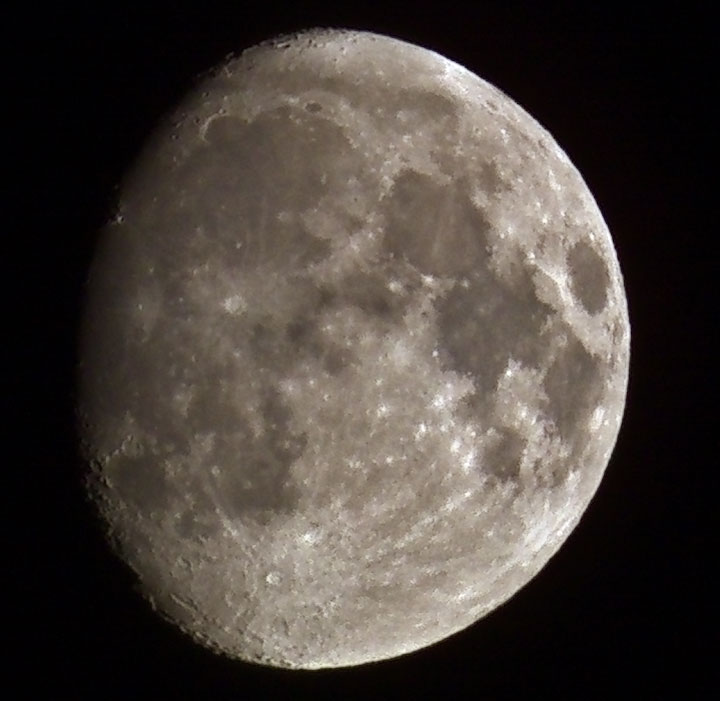
That long lens is great for moon shots!