Exposures
Zone system testing begins with an exposure series.
|
|
|
I made two exposure series with each camera, one consisting of out-of-focus images of my 30-year-old Kodak gray card, and one of a “standard texture” for testing purposes. The gray card images are the important ones; they are intended to be textureless for image noise measurement. Conventional wisdom calls for using a textured surface for a zone series, so that the texture limits may be determined. To jump ahead a little, I have found that texture is visible pretty much all the way to the extremes of digital images, and noise measurement of textureless images is more important.
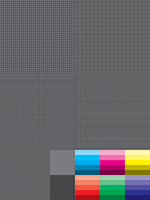
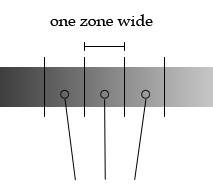
The texture target is an untagged CMYK .tif which prints as (mostly) black ink only if you use a suitable printer (such as a RIP). I adjusted the gray values so that, on my printer, the middle-value squares are middle gray, and the light and dark squares are one-half stop above and below it in value; the texture is thus one zone wide, according to Minor White’s concept of a zone as a finite region of the value scale. (The thumbnail is a link to the texture target should you want to play around with it. It is important to print it on matte paper that has no optical brighteners.)
To make a zone series, it helps to set up your camera on a tripod in front of a suitable target. Any evenly-illuminated neutral smooth matte surface will do. For noise measurement, be sure that the images are out-of-focus at the apertures used for the exposures. This is easier if you are close to the target; be sure that the lighting remains even, with no reflections or shadows. You will probably want to avoid long exposures, one second or more, as some cameras suffer from a lot of long-exposure noise. Also, to the extent that you are able, be sure that no noise reduction or other in-camera processing is being performed.
Meter the surface; the indicated exposure places it on zone V. Increasing the exposure by one stop places it on zone VI; decreasing it similarly places it on zone IV. Make a series of exposures running from zones -IV to X. Between zones VII and X, I use one-third or one-half stop increments, as available, for finer measurement of the highlight values; the remainder of the series is in one-stop increments.
Below is a zone ruler made with the Nikon D700; it runs from zones -II to VIII. The RAW images were processed with no adjustment except white balance, which explains why there is so little shadow contrast. (For this and other images on this site, it helps to have a good, well-profiled monitor; otherwise you may not see the distinction between the darkest squares in this image. I almost can’t with this, my small web-surfing monitor.)

|
||||||||||
| -II | -I | O | I | II | III | IV | V | VI | VII | VIII |
Next: the analysis