
|
||||||||||
| -II | -I | O | I | II | III | IV | V | VI | VII | VIII |
Analysis
The simplest way to analyze the exposure series is to look at the processed images and see where the highlights blow to white, and the shadows become so dark that they might as well be pure black. (I say this because, depending on how they are processed, the lowest zones may not actually reach pure black.) Constructing a zone ruler is a convenient way to summarize your results.
|
|
||||||||||
| -II | -I | O | I | II | III | IV | V | VI | VII | VIII |
You can process the images differently and then reassess. The ruler above was made with no adjustment to the RAW images; below, the Blacks level was raised to 2 in Adobe Camera Raw, reducing the tonal range by one stop but increasing the contrast between the shadow zones. (If you look very hard, you may see a small amount of noise appearing in the shadows as well. Note—because the end of our workflow is a print, these and other images here are reduced to print size, 32% of the original, based on a 300 ppi print resolution. Exceptions will be noted. Also, a dark background makes the shadows easier to see.)

|
||||||||||
| -I | O | I | II | III | IV | V | VI | VII | VIII | |
At this point, your could print your zone ruler; and if it meets your expectations, you are finished. Congratulations! You have calibrated your workflow and are ready to use the zone system. (And you already know more about it than many people who merely talk about it!)
However, much more can be done than this, including greater manipulation of the images, and more detailed analysis. To start, lowering Exposure to -2 (I call this N-2) reveals highlights all the way up to zone IX:

|
||||||||||
| O | I | II | III | IV | V | VI | VII | VIII | IX | X |
Below are details of photographs of the standard texure target, with a white bar at the bottom for reference, illustrating the detail that is recoverable in zone IX. (Note the phenomenon called “blooming,” in which very high exposure values cause sensor voltage to bleed into neighboring pixels; similar to halation in film images.)
| N, zone VII 1/3 | N-2, zone IX | |
 |
 |
And raising Exposure to +2 reveals shadows down to (more or less) zone -III, but also results in significant noise, especially in the shadows:

|
||||||||||
| -IV | -III | -II | -I | O | I | II | III | IV | V | VI |
The Beyond the Digital Zone System tool
Measuring and graphing the L* values and signal-to-noise ratios allows a deeper analysis of the zone placements and the results of processing the images in an exposure series. I have written a Photoshop script, the BTDZS tool, that automates the process and generates CSV (comma-separated values) output that can be opened and graphed in a spreadsheet program. (Documentation for the BTDZS tool is found on the resources page.)
For example, here is a graph of the L* values, noise, and signal-to-noise ratio of the images comprising the first zone ruler above.
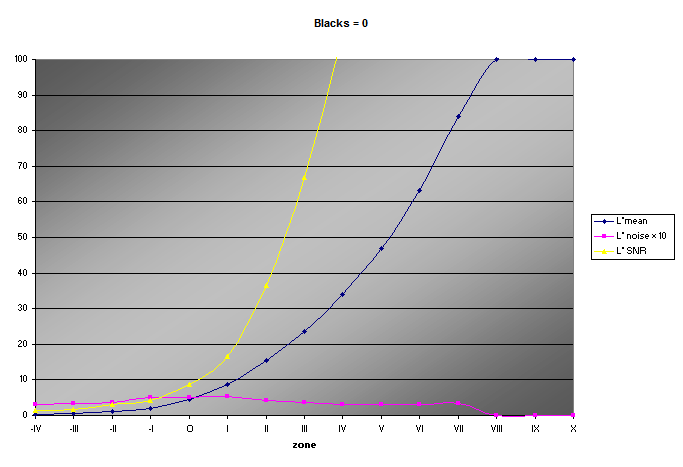
Increasing Blacks to +2 increases shadow contrast while reducing the tonal range. However, the signal-to-noise ratio decreases with the decrease in shadow values, most markedly in zone O, resulting in more apparent noise in the image.
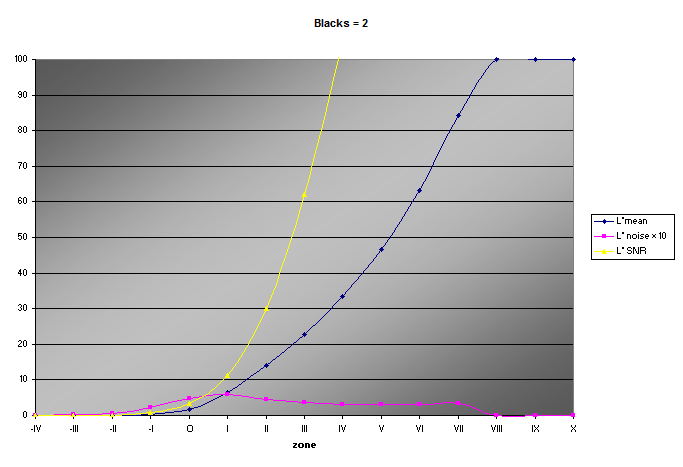
To summarize what is to come, the highlight threshold of digital image capture depends on the upper limit of image luminance values, but the shadow threshold depends on a combination of the lower limit of luminance values and acceptable signal-to-noise ratio.
Below are details of photographs of the standard texure target, with a black bar at the bottom for reference, reduced to print size for display as are all the images above. The measurements refer to the large uniform square of the original images. When printed, the first image shows no visible noise. The second shows some barely-perceptible noise in a very good light. The third, besides being a little too dark, does show some noticable, but not too objectionable, noise. The noise in the fourth image is clearly visible, and is more likely to be objectionable in a fine print; detail is beginning to be obscured as well.
| N, zone O, Blacks = 0 | N, zone -I, Blacks = 0 | N, zone O, Blacks = 2 | N+1, zone -II, Blacks = 0 | |||
 |
 |
 |
 |
|||
| L* = 4.0 SNR = 8.1 |
L* = 1.8 SNR = 4.0 |
L* = 1.3 SNR = 3.2 |
L* = 2.0 SNR = 2.7 |
For this particular system, a good minimum shadow SNR is probably about 4.
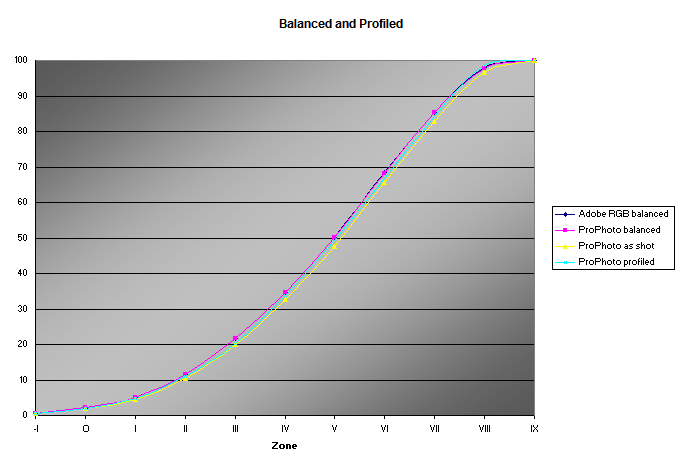
Side note—the images used for these tests were taken in the shade of a white wall, so there is a definite blue tint to them. I white balanced them for the tests. Below are the effects of white balancing, changing the color space from Adobe RGB to ProPhoto RGB, and using a ColorChecker Passport camera profile as opposed to Adobe Standard.
Another side note—Alan Ross included comparison black and white patches with his gray card zone ruler images at www.alanrossphotography.com/2012/02/can-the-zone-system-go-digital/.

|
|||||||||
| O | I | II | III | IV | V | VI | VII | VIII | IX |
Next: the Nikon D700