Beyond the Digital Zone System
A general approach to applying the zone system to any photographic media
As previously stated, the zone system is a practical sensitometry in which subject luminances are assigned to specific exposure zones, and the subsequent photographic process controlled, so as to produce the intended image values. Its purpose is to enable visualization, or knowing ahead of time how you want the final image to look, then determining the exposure and controlling the process to accomplish the intended result.
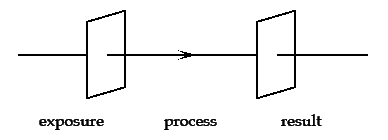
I consider the sequence of events in making a photograph to have two major landmarks, the exposure and the final result, separated by a photographic process of some sort. Some might use the word “capture” in this context rather than exposure, using the latter to refer specifically to the shutter speed and aperture combination that is used to expose the photosensitive medium to light. At any rate, the exposure, and the events leading up to it including visualization, metering, and the assignment of subject elements to zones, represent the first step in the creation of a photograph. The intervening process is subject to various controls, depending on the medium in use. To master the controls available, they must be tested, the final result evaluated, and the exposure and/or process adjusted as indicated. And this can be accomplished when using any medium; the photographer’s task is to explore the medium, learn how it responds to exposure, discover what controls over the process are available, and make maximum use of those controls. Applying the zone system to a new medium can thus be summarized (it’s not rocket science, but it makes a nice framework):
1. determine the exposure (based on placement of subject luminances onto exposure zones),
2. control the process, and
3. evaluate the result (with emphasis on comparing image values to subject luminances/exposure zones).
Determine the exposure
Determination of the exposure requires visualization, measurement of subject luminances, placement of those luminances onto exposure zones, and determination of the actual exposure based on knowledge of the medium.
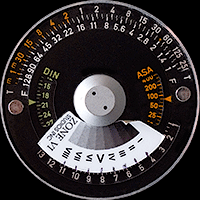
The first step in the making of an expressive photograph in any medium is visualization. Based on one’s knowledge of the medium, one evaluates the scene, and decides how it is to look in the final result. Luminous, enveloping light, or a stark silhouette? Brilliant, sparkling highlights, or soft, delicate ones? The choice is yours. One then measures the subject luminances; and to make full use of the zone system, this generally means using a spotmeter. I am used to using my Pentax V and prefer it for the time being; but most good digital cameras now have a spot metering function built-in. Subject elements are then placed onto exposure zones, again based on one’s knowledge of the medium. Testing will determine where the highlights “blow” to pure white; and where the shadows lose their ability to record detail, or become lost in electronic noise.
What about the histogram, you ask? I am tempted to reply, “Excuse me, I am talking about the real zone system.” But in reality, no tool is off-limits; if you are able to use the histogram make a determination of subject luminances that is sufficient to allow you to place them where you want, go for it. But my guess is that there will always be times when the need to measure critical luminances of small image elements will make a spotmeter come in handy.
Now comes the actual determination of exposure. The published ISO speed of any medium should be considered a starting point, because it may or may not be based on what is important to you as a photographer. In black-and-white negative photography, the threshold shadow value is usually used to determine the effective film speed. This also works with color negatives, as modern color films retain highlight detail well above zone X that can be recovered in the scanning process. With reversal materials and digital, the highlights are more of a fixed limit. But even these may be maniupulated digitally (more about that below), and may not be ideal for determination of effective speed. There is always zone V, middle gray, to fall back on, and it may make more sense to determine what effective speed causes the exposure indicated by the meter (zone V) to end up as middle gray in the print, or a middle luminosity (such as L* = 50) in the digital image file.
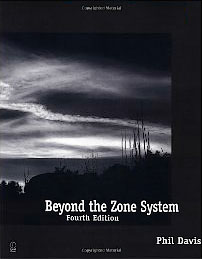
Testing usually involves making an exposure series of some sort. Both Ansel and Minor White described their methods for doing it with large format; Ansel suggested making a four-value target to simplify the process. Roll film makes the procedure much easier. Large-format film is more expensive than most other media (and large-format Polaroid especially so), and I am the sort of person that people call “thrifty” when they really mean “stingy”; so I used to test 4×5 film by sliding it into the film holder under a Stouffer step tablet, then analyzing the results with my Pentax V converted into a densitometer as described by Phil Davis in Beyond the Zone System. I even made a power supply for the meter so I wouldn’t run down the batteries. (In-camera flare is not accurately accounted for by this method, so in the end I would make a few conventional exposures to verify and adjust the results.) My point in describing all this is to point out that making and evaluating a series of digital exposures is so easy (and cheap!) that there is no excuse not to do it. One method is to simply set up the camera in front of a uniform surface, and make a series of exposures from zones -IV to X. (You really can get digital image values from zone -IV, but they are not what you would want in a fine print.) It is then a simple matter to evaluate the results in Photoshop. The original content of the Beyond the Digital Zone System site was my “test run” of this procedure with a Canon G11 camera. I am now in the process of refining the method and applying it to a Leaf Aptus-II 5 medium format digital back, and a Nikon D700 digital SLR; the full procedure and results will be the next addition to the site.

Zone ruler, Canon G11, zones -I to IX
Other factors that come into play when making the exposure, and whose effect can be determined by testing, include reciprocity departure (when using film), long-exposure noise (when using digital), the color temperature of the lighting (daylight vs. tungsten, for example), and flare and the presence or absence of lens coatings. Then there is the issue of the response of the medium (and the light meter) to subjects of different colors, which has been of interest to photographers since at least the invention of film. The possibilities are endless, but they can all be discovered and mastered with sufficient experience and testing.
Control the process
This is where most of the control over image-making takes place, and where different photographic media diverge most widely. Whatever process one is using, one calibrates it by testing, then controls its execution by choice of method or parameters thereof.
Ansel’s main process control was varible negative development. Options include the choice of agent, time, temperature, dilution, and further variations such as the water bath technique and agitation methods. Polaroid materials can be controlled by varying the development time as well. Then comes printing, with choice of paper, grade, and paper developer. Variable contrast paper introduces its own set of controls, especially if one is using split filtration printing (highly recommended!). The type of enlarger, diffusion or condenser, or contact printing, affects the outcome and is an important part of the process. Further parameters include print toning and negative intensification (as an integral part of the process, as opposed to “salvage” of a poor negative). Film pre-exposure officially happens prior to the actual image exposure, but I think of it as part of the processing in that it is intended to raise the shadow values.
When using film, further options depend on the type of film and the choice of print medium. Color film comes in two types, negative and transparency, each with its own type of chemistry, printing paper, pros, and cons. Color negatives are not well-suited to control by variable development, but color transparencies are to an extent. Other print media include platinim/palladium, cyanotype, bromoil, and gum bichromate, to name a few; some benefit from the creation of an enlarged internegative, which is another whole aspect of the process, and nowadays is sometimes created digitally. Commercial print media, such as halftone and gravure, have their own characteristics and require their own set of processing controls. When using transparency film, the final result may not be a print at all.
Old-timers who learned photography in the darkroom (what am I saying?) and decide to foray into digital often choose scanned film as their first digital medium. This is an entire world in itself, and considered by some still to be a viable first choice in digital, especially if multi-hundred-megapixel images enlargeable to billboard size appeal to you. The advent of HDR scanning allows the kind of image-making control that RAW processing provides, with the potential for more dynamic range than any digital capture can dream of at the present time. High-quality flatbed scanners have been available to consumers for some time now; and if you decide to forego buying that second vacation home for the time being, you may even be able to afford your own drum scanner.
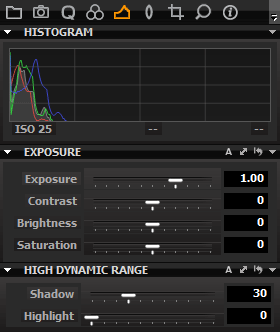
With digital capture, the main controls are RAW conversion, and raster processing with programs like Photoshop and its attendant world of plugins. Variable negative development has been replaced by the contrast slider. The RAW conversion is the key step in determining the dynamic range of the final image, and where I have placed most of my own emphasis to date. Determination of shadow and highlight threshold and effective film speed all depend on choices made in the RAW processing stage, and fortunately more options, and more control over the process, are available all the time. Noise reduction and sharpening are further options to consider, and primarily contribute to the process as they affect the useful range of shadow values. Digital capture also opens up the world of multi-exposure techniques, which were available but limited and technically difficult to use in the film era. HDR processing now allows digital photographers to create images from high-luminance-range subjects that could only be dreamed of in Ansel’s day, even with compensating developers like pyrogallol (again, highly recommended!).
Digital printing requires its own set of controls. The system, including monitor and printer, must be carefully color-managed for optimum results. More choices in high-quality inkjet printers are available all the time; besides dye vs. pigment, there is a growing number of ink colors to consider. And there are also giclee, lightjet, and laserjet. A variety of digital printing software is available, for both color and monochrome printing. To RIP or not to RIP? (I say RIP.) With film or digital printing, the choice of glossy, satin, or matte paper surface, or another print medium entirely, affects the outcome. It is even possible to create a digital image, from whatever source, then print it on high-quality transparency film and use it in an enlarger in the darkroom, or as an enlarged contact negative.
The point to all this is that every photographic medium—even roll film, color, and digital—has its own set of controls, which may be explored and used to maximum advantage when converting subject luminances into print values.
Evaluate the result
To make full use of the zone system, you will need a way to evaluate your test results to see if your zone placements are really resulting in the image values you wanted. Eyeball testing can work; negatives can be examined and compared for visible shadow threshold density, or a series of images can be made into a “zone ruler” to assess the effective speed and dynamic range. Different papers or paper grades can be assessed as well.
More detailed analysis can be done with a densitometer. Phil Davis in Beyond the Zone System describes how to make one using a spotmeter. I used mine to measure negative images of a step tablet as described above, and roll film color negative series. With good uniform illumination, this method works for prints as well.
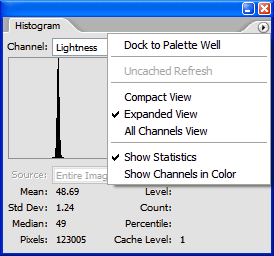
Digital image files can be easily measured using Photoshop as a “densitometer.” I measure the L* (lightness) values of the images in an exposure series, and graph them using a spreadsheet. The luminance noise can be measured as well; convert the image to L*a*b* and read the standard deviation in the histogram statistics of the lightness channel. Then divide the mean by the s.d. for a simple measurement of the signal-to-noise ratio. (Note—Photoshop’s histograms are all based on a scale of 0-255; you will need to multiply the Mean and Standard Deviation in the statistics to the right by 100/255 to scale them to the usual L* range of 0-100.)
The most important information that you need about your system is the complete dynamic range; this is based on the shadow and highlight thresholds. The effective speed may be based on these as well; but other measurements, such as zone V, may be better as described above. Especially with digital, if you know which highlight zone saturates to pure white, and how far down the useful shadows extend, then you will know how to record all of the subject luminances that you visualize, confident that you got them all. (Let me repeat that: you will know how to record all of the subject luminances that you visualize, confident that you got them all. This is the beating heart of the zone system.)
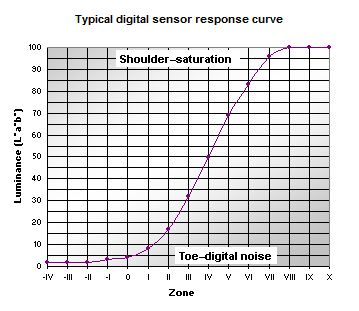
More detailed analysis can tell you more about your system. Graphing your densitometer results (from Photoshop or otherwise) will show you the actual response curve of your medium as you processed it. The conventional areas of interest are the baseline, known as filmbase-plus-fog with negatives, or the noise floor with digital; the toe of the curve, which is the gradual increase in slope of the shadow values; the slope and extent of the straight-line section; and the shoulder, which is the leveling-off of the values at the high end. Comparing curves can show you the differences between films and developers, or the differences between digital cameras, or the effect of moving different sliders in your RAW converter, or the differences between RAW converters themselves (yes, there are differences!).
Having analyzed your test results, you may need to adjust your exposure or process. You may learn that the effective speed of your film or digital camera differs from what the manufacturer says it is, or that you are able to record much less highlight detail than you expected, or that your default RAW conversion settings should be adjusted, or that noise reduction doesn’t help your shadows as much as you thought it would. Film photographers use the results to determine development times for normal, plus, and minus development. Your results may help you choose between films, developers, digital cameras, or RAW converters. At any rate, once you have fully calibrated your system by testing, you will have accomplished the goal of being able to visualize a photographic result, and then achieving it, using the zone system with whatever medium you have chosen.
Bottom line:
1. determine the exposure,
2. control the process,
3. evaluate the result.