

An Introduction to Photo Editing with PhotoLine: Printing
Printer profiles
The making of fine prints requires some preparation. The first thing that you need is a good printer profile. These are specific to the printer, the paper, and the printer settings such as resolution. Major paper manufacturers usually provide such profiles; here, for example, you can download a profile for Ilford Galerie Gold Fibre Silk and a Canon iPF 6350 inkjet printer. Or, you can make you own profiles, such as with a device from X-Rite.
An often-overlooked step is the determination of the printer profile output levels. Here is a printer target image with dark patches ranging from RGB 1 to 20, and light patches from 235-254 (and one with dark patches from 22-60 for plain or low-quality paper). No matter how good your printer and paper are, a number of patches at the extremes will not be visible when you print the target. (You may not be able to see them all on your display either.) Before printing a fine print, histogram correction output levels must be assigned to keep the image’s dynamic range within the range that will actually print.
|
|
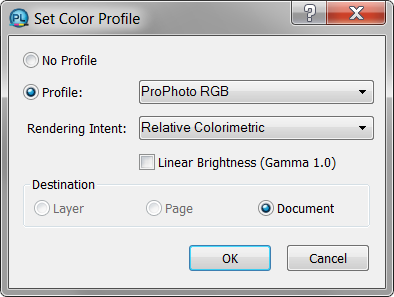
To determine the output levels, print the target using the printer profile and paper in question. The images above have the sRGB color profile assigned; reassign it if necessary to that of the images that you will be printing, such as ProPhoto or AdobeRGB, via Tool – Color – Set Color Profile, Rendering Intent: Perceptual. (Note that this is a special case; existing profiles are not usually reassigned but converted to.) Let the print dry, then examine it in a good light. Note the first light and dark patches that you can really see; the output levels will be set to one level darker than the first dark patch, and one level lighter than the first light patch, as described below. For example, if the first visible dark patch is 17 and the first visible light patch is 249, the output levels for this profile are 16-250. Adding them to the profile’s file name is one way to remember them.
Display profile
While we are at it, you need a good display profile if you want your prints to resemble what you see on the screen. (They will never be identical, since one is a glowing light source and the other is ink on paper; but with proper adjustment, you can reasonably predict the printed outcome.) One common complaint is that prints look too dark. It usually means that your display is too bright; turn it down. I calibrate my displays to 80 cd/m2. And I will not tell on you if you use a default luminance curve and hue/saturation adjustment when printing.
Resize and sharpen
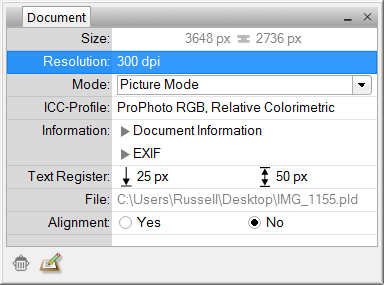
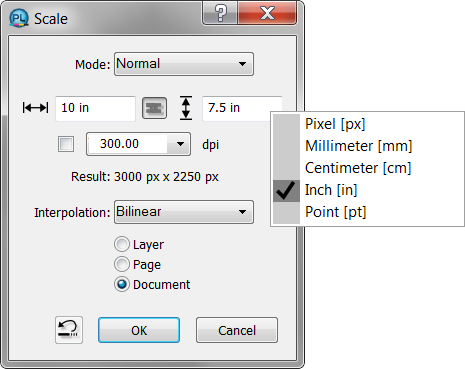
Resize the image if necessary based on your printer’s pixels per inch resolution; do not let the printer do it for you. First, set the resolution in the document properties panel; this will not change the actual size of the image. (Note that in the screenshots below, dpi, dots per inch, should actually read ppi, pixels per inch.) Then scale the image via Layout – Document – Scale Document. Set the mode to Normal, then right-click one of the dimension fields (the default is pixels) and change it to your desired units. To maintain maximum quality, images should generally not be enlarged, but rather kept the same size or reduced, when using the printer’s minimum resolution. If a higher resolution is available, such as 600 rather than 300 ppi, and the desired print size falls between the two, enlarging it to the higher one then carefully sharpening it may result in a little bit more resolution. After resizing, sharpen the image as previously described. Now the image is ready to print at 100% without further resizing.
 |
 |
Proof Mode
Viewing a “soft proof” in PhotoLine to see how it will look printed is a little complicated; there is no one proof dialog where everything can be set at once. First, enable black point compensation via Edit – Options – Color Management – Standard, and make sure that Use Blackpoint Compensation is enabled and checked. I discovered something odd when using Windows 7; if Use Little CMS is not checked, Use Blackpoint Compensation is checked but grayed out, and does not work. In this case, Little CMS must be used, even though Windows has its own color managment system. (In Mac OS 10.10 Yosemite, Use Blackpoint Compensation is enabled and works.) After changing to or from Little CMS, PhotoLine must be restarted.
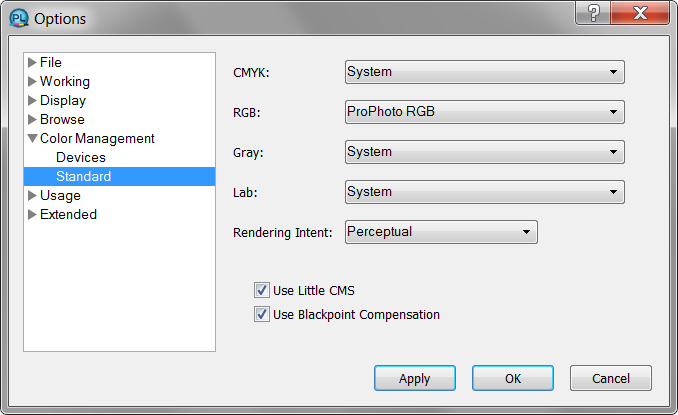 |
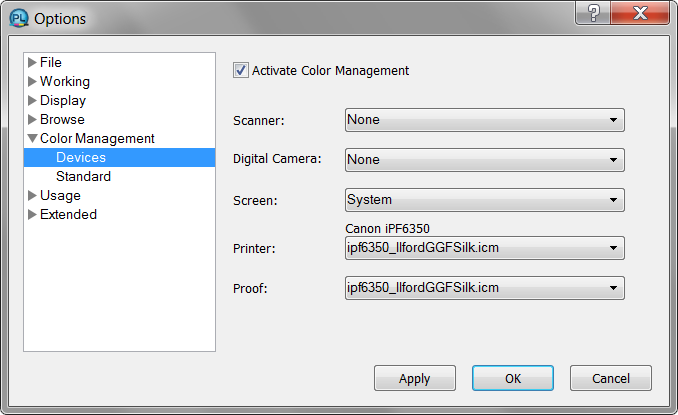
Now set the proof profile via Edit – Options – Color Management – Devices; it should be the same as the printer profile.
 |
View the soft proof via View – Proof Mode. Switch between Perceptual and Relative Colorimetric rendering intents via Tool – Color – Set Color Profile (or double click ICC-Profile in the Document panel, or the Layer panel if the layer has a different profile; be careful not to change the actual profile). The proof may not look very good; it is rendered as if using the options “simulate paper color” and “simulate black ink,” which is intended to provide a hard-core literal reproduction of the print on your screen. But it can be hard to interpret because paper and ink are not the same as glowing screen pixels, and there is no way to turn these options off. Even more unfortunately, there is no way to view a “gamut warning” of out-of-gamut colors. (Little CMS has that ability; just saying . . . . On the other hand, the actual value of a gamut warning in addition to a soft proof has been questioned. When using Relative Colorimetric rendering intent, it is intended to tell you where areas of the print need to be desaturated to fit into the printer’s gamut without unpleasant degradation.) Be sure to turn off proof mode when you are through, or you will wonder why everything looks so terrible.
 |
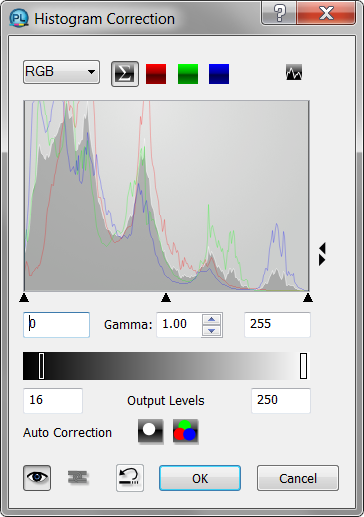
Output Levels
When you are satisfied with the image and ready to print it, set the output levels determined above via Layer – New Adjustment Layer – Histogram Correction, and set the layer blend mode to Luminance. In the example above, the output levels were found to be 16-250. You will use these levels whenever you use this printer profile. It may help to save this step as an action.
 |
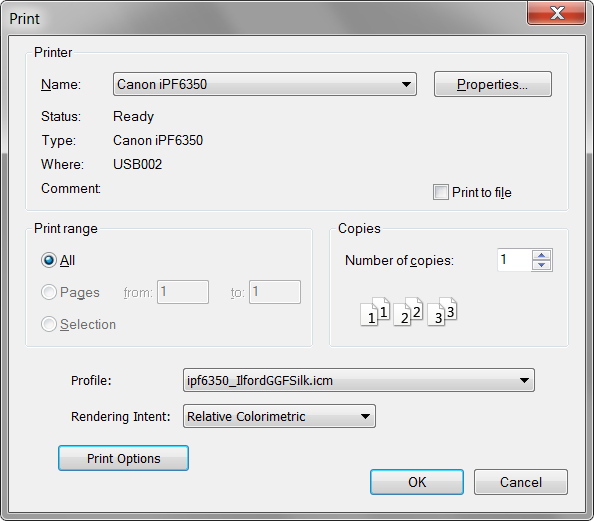
Printer profile and print options
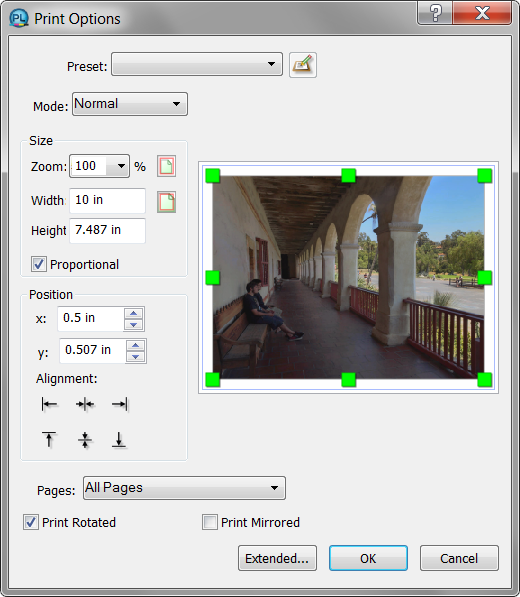
Now for the big moment: File – Print. It is probably better to set the printer profile in PhotoLine rather than letting the printer do it, so color management will need to be disabled via the printer’s own properties. The resolution, quality, paper type, and all other parameters specific to the printer profile must be set in the printer properties as well. (Save them as a preset if possible.) Set the profile and rendering intent on the Print dialog, and the size and position in Print Options (100% as described above).
 |
 |
Then click the OK button and sigh with relief.
Next: placeholders
