
Combining Multiple Exposures with SilverFast HDR®
I had the good fortune to obtain a copy of SilverFast Ai with my Epson 4870 scanner, and lately I have been using it to scan medium-format color negatives. I spent a long time frustrated by the lack of control over the histogram while using SilverFast’s NegaFix utility, and originally wrote this page to accompany a thread in the SilverFast Forums. The official SilverFast documentation is so sparse for an application of this complexity, that one seriously wonders if even its developers fully understand it. (I even bought the little book.)
I have since, with a lot of online help such as Ian Lyons’ invaluable tutorials, managed to hammer out a way to create an image that maximizes the full potential of the negative while making use of the color adjustment provided by NegaFix. In short, one combines a number of scans at different “exposures” to create a full-scale image.
A negative can record a greater range of values (the blue curve below) than are reproduced in the normal scale of a print, and simply compressing the values to fit them all into the final image produces a low-contrast, unexciting result. NegaFix is apparently constrained to expose the negative within a fixed dynamic range (the red curves below), and there doesn’t seem to be anything that you or I can do about it; but this range can be moved up and down the tonal scale by changing the brightness and exposure settings. This results in lighter or darker images that can then be combined in various ways to make the final print.

The simplest way to combine differently-exposed images is just to stack them. In Photoshop, paste each image into its own layer, then set the opacities as follows: 100% for the background, 50% (1/2) for the next layer, 33% (1/3) for the next, 25% (1/4) for the next, 20% (1/5) for the next, and so on. Utilities such as Photomatix can do this automatically. The result is likely to be a slight improvement on the original image. More esoteric ways of doing it involve adaptive contrast and tone mapping; Photoshop CS2 and above can do this, as well as applications such as Photomatix; but to me the results are seldom an improvement. (Yes, you can get it to work; no, it doesn’t look very good. If you are curious, get a utility like ExifTool/ExifToolGUI and assign fictional exposure values to the images.)
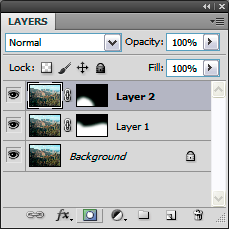
A better way to do it is to make exposures optimized for different areas of the image, such as highlights, midtones, and shadows; stack them; then use layer masks to “paint” different areas of the image with different exposures. To create a layer mask, first select the relevant layer; click the circle-in-rectangle “Add layer mask” button at the bottom of the layers palette; click the layer mask thumbnail if necessary to make it active; then paint the image with black to hide the layer, white to reveal it.
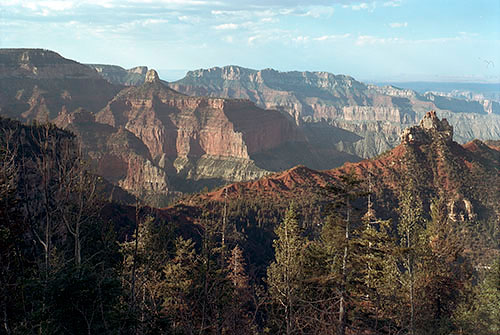
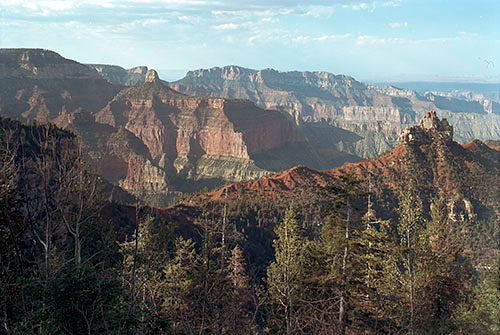
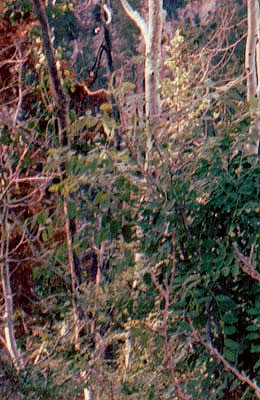
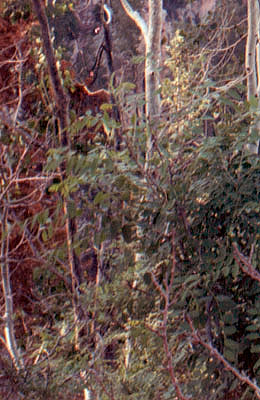
Below is a photo taken from the north rim of the Grand Canyon. I wanted to lighten the foreground, and the dark area to the left in particular; so I made three exposures with SilverFast and masked them in Photoshop with the masks shown above. Roll your mouse over either of the images to switch them (JavaScript requred).
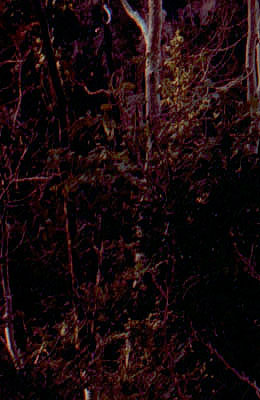
Why not just lighten the shadows by dodging, or using curves or other adjustments? Because there is more information in the raw scanner data than there is in the final image, especially in the shadows. Below is an enlarged view of the lower left corner of the north rim image. The first image is very underexposed, as it is in the image above. The second is a copy of the first, lightened with an extreme curves adjustment. The third is a new scan of the image with exposure and brightness increases. Notice that the shadows retain much more detail in the latter image.
The most efficient way of making multiple exposures is to use the application known as SilverFast HDR, a post-scan utility that resembles the Silverfast scanning software, but whose purpose is to process raw scanner files created by the latter. One first makes a “48 Bit HDR Colour” scan using the scanning software. This file stores the raw output of the scanner, and minimal adjustment is made at this point. SilverFast HDR is then used to process the raw data in the HDR file, converting it into a conventional image the way the scanning software normally does. It is at this point that NegaFix and other adjustments are applied. Using SilverFast HDR, it is a simple matter to process the image multiple times at different exposure levels. Ideally, the actual scan need never be repeated.
If all you intend to do with the scanning software is make HDR scans, the entry-level SilverFast SE is all you will need. Some of the options in the screenshots below will not be available, but these are not used in making HDR scans. SilverFast SE Plus and Ai Studio have multisampling and multi-exposure features, but I have not found them to be of practical benefit with negatives. The main advantage of the HDR Studio version is the ability to calibrate your scanner using an IT8 target; it works very well should you have a need for it.
I do not intend to offer a comprehensive SilverFast tutorial here. These are just a few observations that are not addressed anywhere in the SilverFast documentation. When making the HDR scan of a negative, SilverFast can be set to scan the image as either a negative or a positive. The resulting image is a negative in either case; the important difference is that when scanning as a negative, NegaFix is active, and the histogram can be expanded to fill the entire range of available values. When scanning as a positive, the histogram is copied as-is, usually narrower than the entire range. When processing the positive-scanned image, the final expanded histogram tends to look a little bit “combed,” indicating some data loss; a negative-scanned histogram is smoother, suggesting that it is better to let the hardware and scanning software expand the histogram during capture.
Another difference between scanning as a negative vs. a positive is that in the latter case, a scanner transparency profile can be applied. The option is not otherwise available. In reality, it has little effect on the final result.
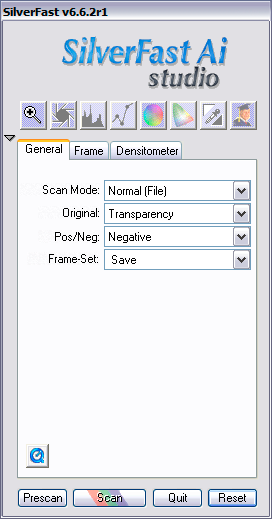
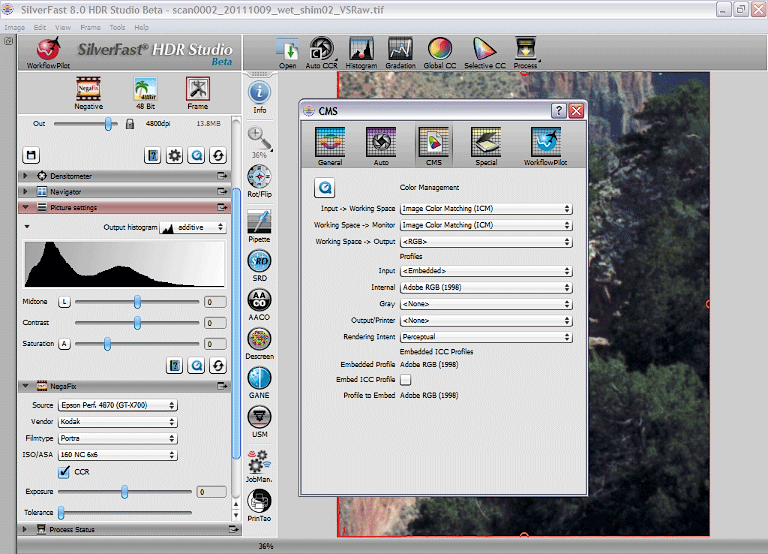
I prefer to capture as much raw scanner data with as little modification as possible; so I scan as a negative, set NegaFix to linear, do not apply color cast removal, and use the Auto levels adjustment. (I also make sure that Gamma Gradation for HDR output on the General tab is unchecked, and all the options on the Auto tab are turned off.) The only adjustment that occurs at this point is histogram expansion. Below are some screen shots.
1. The scan: I set NegaFix to <Other> <Other> <Linear>, uncheck CCR (color cast removal), and check Auto.
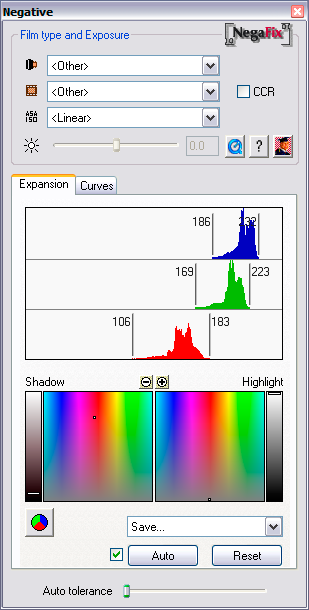
2. Processing the HDR file: set NegaFix to your scanner and film type, and check CCR. In the example below, I have set the exposure to -1.0 stop.
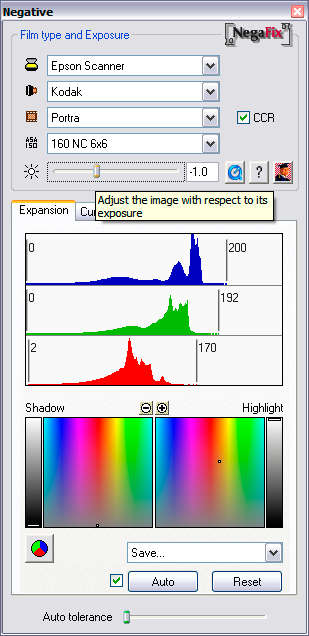
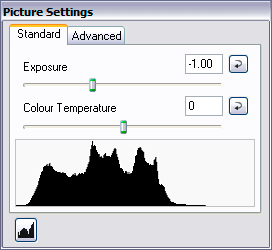
Note that the NegaFix panel and the Picture Settings panel both have Exposure sliders. The nomenclature is unfortunate because they do different things. The one on the NegaFix panel moves the midpoint of the histogram, similar to Brightness on the Advanced tab of the Picture Settings panel. Exposure on the Picture Settings panel moves the highlight end of the scale, setting the white point, similar to Adobe Camera Raw.
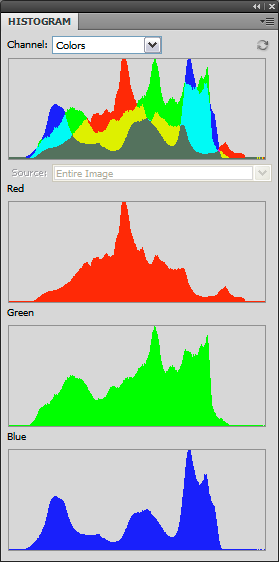
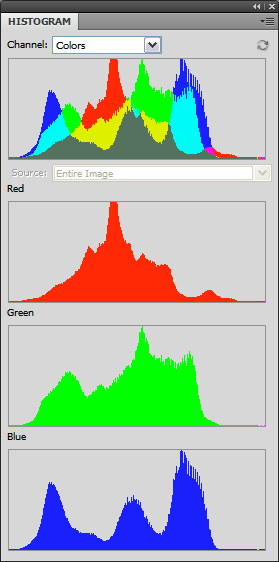
The histograms of 2 images made from the same negative, scanned as an HDR first as a negative, then as a positive. Color management was not used in either case. Each HDR was then processed identically to produce a 16-bit image. Note the rougher histogram of the positive-scanned image.
Update, 1/21/2011:
I had wondered if SilverFast’s HDR files were truly “high dynamic range,” using 16-bit floating-point values the way OpenEXR does. But after comparing them to OpenEXR files generated with bracket, it appears that they are not. They are merely the raw, linear (non-gamma-corrected) and non-color-corrected, scanner output. See Christian Bloch, The HDRI Handbook: High Dynamic Range Imaging for Photographers and CG Artists for a good explanation of what an HDR file is.
How does SilverFast compare to VueScan? Several versions ago, I gave up trying to master VueScan’s interface. But the latest version, 9, has since come a long way. As scanning software, it has several advantages over SilverFast, not the least of which is the fact that one version will work with all supported scanners. And several other features look attractive: one-pass multisampling, and the ability to create one’s own film profiles. However, especially for processing color negatives, SilverFast HDR is miles ahead of VueScan’s raw file conversion capability. One option might be to use VueScan Pro to scan, and then SilverFast HDR to process the raw file (the files are fully compatible).
Update, 9/10/2011:
Upgrade to SilverFast 8 for $204? At 50% off? And there is no SilverFast HDR 8? What’s up with that? Buy VueScan Standard for $39.95 and get a free upgrade to VueScan Pro by sending Ed Hamrick a statement that you don't plan to buy SilverFast 8, the e-mail address used to purchase VueScan Standard, and scan of your SilverFast serial number. Then make your raw scans with VueScan (one version for all supported scanners), and process them with SilverFast HDR.
Update, 10/9/2011:
Some notes, having used VueScan Pro for a little while now. Others have noted as well that the program stops responding or shuts down every now and then. I found out that it quits whenever the monitor profile is set to a custom .icm profile; I had to set the profile to a device-independent color space such as AdobeRGB. And I was hoping that the multisampling feature would be a benefit; when scanning Kodak Portra 160 NC, its effect is like a mild noise reduction, smoothing the grain but also softening some fine image detail. So I haven’t been using multisampling.
Update, 10/10/2011:
Well, it’s here: SilverFast HDR 8 Beta is available for download. Here it is, in all its glory. The palettes are all docked to the left edge in a scrolling column by default, which is convenient; but the Exposure and Colour Temperature sliders on the Picture Settings palette are missing, which is unfortunate because that Exposure did something different from the NegaFix Exposure slider. And it still opens VueScan Raw files. Other than that . . . .
Update, 3/24/2012:
I have finally settled on a workflow for digitizing my negatives:
raw scan with VueScan Pro — spot and retouch in Photoshop — process with SilverFast HDR
Making raw scans with VueScan is about two orders of magnitude easier than it is with SilverFast, and one version works with all supported scanners. I ran into trouble a few weeks ago trying to scan 4×5 negatives at 4800 ppi; the resulting raw scans were 2.3 GB in size, too big for many applications, including VueScan 9.0.86, to handle. So I wrote to Ed Hamrick and he fixed it for me. The current version, 9.0.89, handles the high-resolution 4×5 scans with ease, and a few compatibility issues have been ironed out besides. However, SilverFast HDR will still not open VueScan’s large raw files, over 2 GB in size, for some reason. But Photoshop will; and after saving the image with Photoshop, SilverFast HDR then opens the large files with no problem. So step 2 in the workflow is to fix the dust spots in the raw file with Photoshop. (Tip: add Invert and Curves adjustment layers, select the Background layer and use the Healing Brush and Clone Stamp tools, then delete the adjustment layers and save the file.)
VueScan, of course, can be used to process the raw file; but I believe that SilverFast HDR still has quite an edge as to the quality of the NegaFix curves and the degree of control over the process.
Update, 11/26/2012:
The upgrade from SilverFast HDR 6.6 to 8.0 is now available, for only $124.50 (that’s 50% off the full price). Naah . . . .
NegaFix_vs_Photoshop_en.pdf at silverfast.com