A Head-to-Head Comparison: Windows vs. Linux
The previous page compared the results of zone system calibration of three different cameras using Adobe Camera Raw and RawTherapee. As usual, the operating system was Windows 7. However, RawTherapee is also available for Linux. Is is possible to perform this kind of system calibration in Linux alone?
Yes and no; the workflow that I used includes a few applications that require Wine, the Windows compatibility layer. I performed the calibration below in 2014 using Ubuntu 14.04 (Trusty) and Fedora 20 (Heisenbug); the Wine versions were 1.6 and 1.7. I have updated the download and installation information as of 2017 for Ubuntu MATE 16.04 (Xenial) and Korora 25 MATE (based on Fedora 25), as well as Wine 2.0 and 2.4, RawTherapee 5.0, and PhotoLine 20.
Ubuntu
The workflow begins with an accurate camera color profile. The Adobe DNG Converter and the ColorChecker Passport software can be made to work in Ubuntu using Wine and the proper configuration settings. The Wine version in the Ubuntu Software Center is still 1.6; several contradictory sets of instructions are available online for installing 2.0; I went ahead and installed it from wiki.winehq.org/Ubuntu:
sudo dpkg --add-architecture i386
wget https://dl.winehq.org/wine-builds/Release.key
sudo apt-key add Release.key
sudo apt-add-repository https://dl.winehq.org/wine-builds/ubuntu/
sudo apt-get update
sudo apt-get install --install-recommends winehq-stable
This installs Wine 2.0 (Stable). Note a few caveats with this method: files are installed to /opt/wine-stable; and menu items are not created for Wine’s built-in programs (winecfg, wine uninstaller, regedit, etc.), you need to run them from the command line. After installation, open the Wine configuration application (winecfg) and install Mono and Gecko as prompted.
Raw images must first be converted to DNGs for use in ColorChecker Passport. A native Linux application, digiKam, formerly converted Nikon’s .NEF and Canon’s .CR2 files o.k.; but the current version of the DNG converer (4.12.0) does not work on my system. So I use the Adobe DNG Converter.
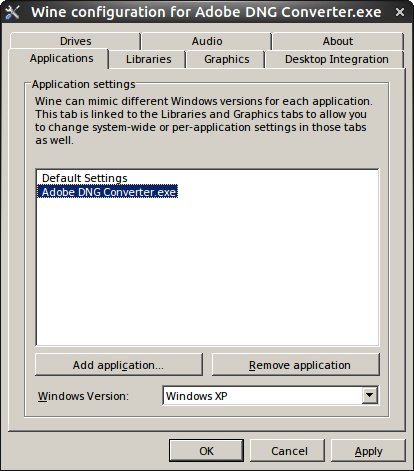
After installing the Adobe DNG Converter, run winecfg. The default Windows version is Windows XP; I always change it to Windows 7. Then add the Adobe DNG Converter (Program Files (x86)\Adobe\Adobe DNG Converter.exe), and change its Windows version back to Windows XP, as illustrated in the screenshot to the left, for it to run properly.
ColorChecker Passport used to be a little cranky in Wine. It now works using Windows 7 as the default version, and drag and drop works too. If it crashes on loading the image, try again. And if, after loading the image, the Create Profile button is grayed out, adjust the corners of the selection mask a little, even if they don’t look like they need it.
The RawTherapee version in the Ubuntu Software Center is still 4.2; instructions for downloading version 5.0 may be found on the downloads page:
sudo add-apt-repository ppa:dhor/myway
sudo apt-get update
sudo apt-get install rawtherapee
Change the color profile directory in the color management preferences to a folder with public access, such as ~/.local/share/icc, if you want to use a standard profile such as ProPhoto as the output profile. Version 5.0 opens all the images that I used for calibration, including Sigma’s .X3F and Fuji’s .RAF files. There is no longer a light theme in RawTherapee; you can get one here.
ImageJ is available through the software center, but the folder permissions are a nightmare; I gave up and downloaded it from rsb.info.nih.gov/ij/download.html.
The resulting workflow:
• Convert the ColorChecker target image to DNG with either the Adobe DNG Converter in Wine, or digiKam.
• Create the camera profile with ColorChecker passport in Wine.
• Calibrate the zone series with RawTherapee and the appropriate camera profile.
• Analyze the zone series with ImageJ.
For general image editing, I use PhotoLine which is fully operational in Wine, including color management and plugins. Here is a tutorial.
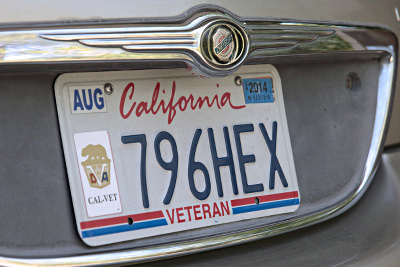
Here are the calibration results (from 2014). The Windows 7 images on the left are the same as those on the previous page; the Ubuntu images on the right were made using the workflow above.
| Windows 7 | Ubuntu 14.04 | |
| Sigma SD15 | 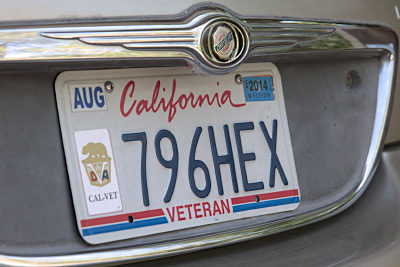 |
 |
| Fujifilm FinePix HS30EXR | 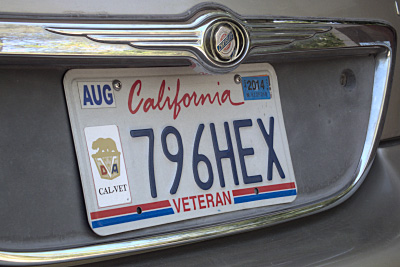 |
 |
| Nikon D800E |  |
 |
Korora/Fedora
The Wine version in the Fedora repositories is 2.4 (Staging) so I installed it using the Yum Extender. (It may also be downloaded from wiki.winehq.org/Fedora.) The default Windows version is Windows 7.
Installation of the Adobe DNG Converter and ColorChecker Passport is the same as the above. RawTherapee 5.0 may be installed using the Yum Extender; instructions are also avaialble on the downloads page. The ICC color profile folder in Fedora is ~/.color/icc/monitor.icm.
| Windows 7 | Fedora 20 | |
| Sigma SD15 | |
 |
| Fujifilm FinePix HS30EXR | |
 |
| Nikon D800E | |
 |
If you are interested, here is a complete color-managed Linux workflow using ArgyllCMS from the command line.
Side note
xcalib is the simplest way to set the display profile. Installation for Ubuntu and Korora/Fedora:sudo apt-get install xcalib
sudo apt-get update
sudo dnf install xcalib
sudo dnf update
Then set the profile (use the path to your profile):
xcalib ~/.local/share/icc/monitor.icm
xcalib ~/.color/icc/monitor.icm
Curious? Here is how to clear the profile:
xcalib -c
If the profile is in a location with public access, you can create a startup application entry to run xcalib automatically.