

A Color-Managed Linux Workflow
Jump to: camera | display | printer
Partly out of curiosity, and partly to help widen the horizon of digital photography, I have worked through a color management workflow entirely in Linux, from raw photo to display to print. It is actually a continuation of my page on zone system calibration in linux. I must admit that the results were more a “proof of concept” than an ideal workflow, partly because of available alternatives, and partly because of limitations on my own ability to print in Linux.
Operating system: Korora 20 (a Fedora remix), 64-bit. The applications below were all installed from the repositories, except for TurboPrint which was an .rpm download.
Color management application: Argyll Color Management System 1.6.3, by Graeme Gill. For Linux, there is no real alternative. I mainly followed the tutorials on the Typical usage Scenarios and Examples page, together with the documentation for each individual program.
Raw converter/image editor: RawTherapee 4.2.
Print utilities: PhotoPrint 0.4.2 with Gutenprint 5.2.9, and the GNU Image Manipulation Program 2.8.14 with TurboPrint 2.35.
Camera profiling target: X-Rite ColorChecker.
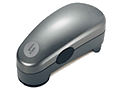
Measuring instrument: X-Rite i1Photo spectrophotometer.
You might also want to check out The Little Argyll GUI.
|
|
|
|
The following are some personal observations about the profiling process. The names of the Argyll programs in the command lines are links to each program’s excellent documentation. Please see these and the Typical usage Scenarios and Examples page for detailed information.
Camera profiling
The creation of a camera .icc profile for raw images requires photographing a suitable target, rasterizing the image, measuring it with scanin, and creating the profile with colprof.
Using as I do a ColorChecker Passport, I use a spotmeter to place the light gray patch at the bottom left on zone VII, or two stops above the meter reading. This keeps it from blowing to white while allowing plenty of latitude for the rest of the target. My favorite profile lighting is overcast skies near midday. .icc profiles, which are created from rasterized images, are more sensitive to color temperature and other lighting characteristics than .dcp profiles created directly from raw images.
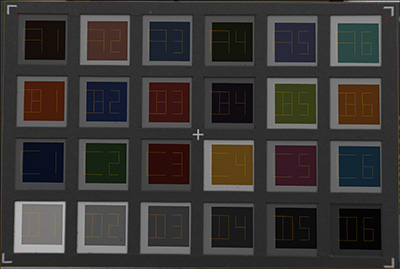
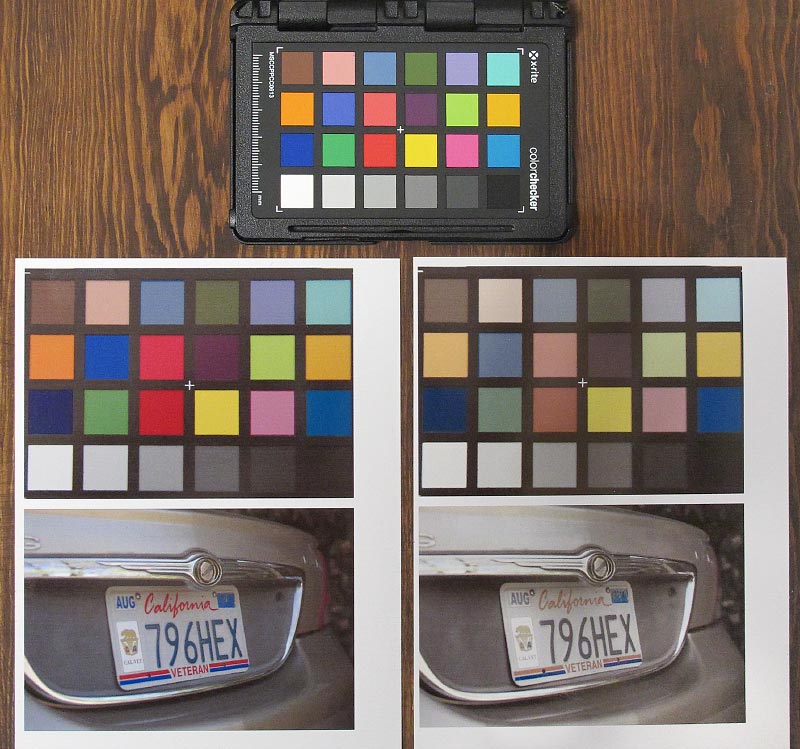
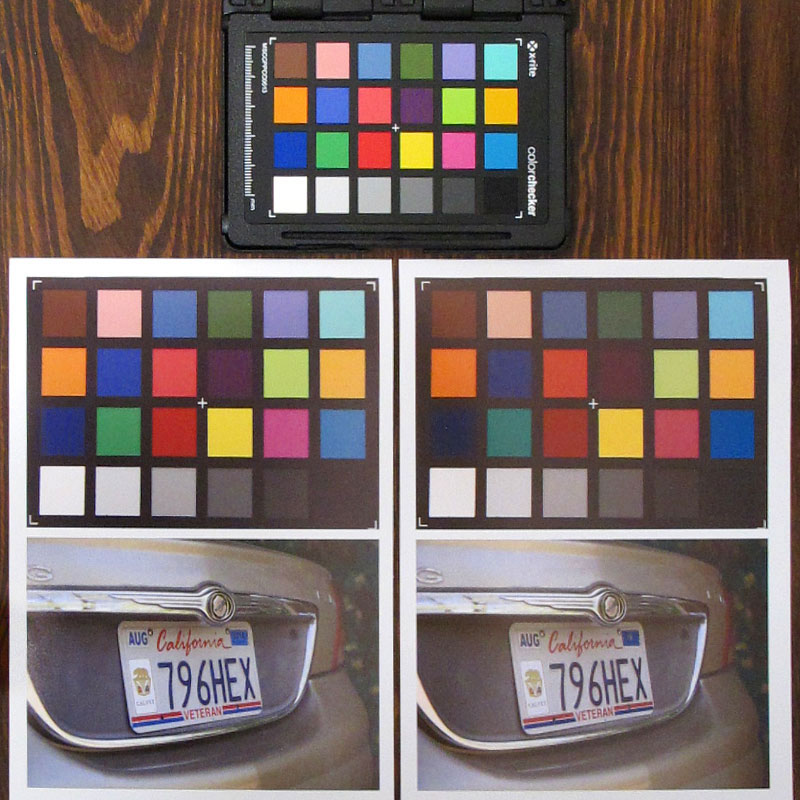
Two files provided by Argyll, ColorChecker.cht and ColorChecker.cie (found in /usr/share/color/argyll/ref), contain the L*a*b* values and other information about the target patches that the program needs to create the profile. The color values are also provided by X-Rite. Note that, based on the sum of the squares of the a* and b* values, the most neutral patch is the fourth gray patch from the left, number 22 in the X-Rite illustration, or D4 in the diagnostic image below.
RawTherapee makes it easy to process the raw image for measurement. Open the raw image and choose the (Neutral) processing profile. On the Color tab, use the Spot WB tool on patch 22 to set the white balance. You may straighten and crop the image as desired. Very tight cropping is not required, and Argyll is able to compensate for perspective distortion. Then, under Color Management, press the “Save Reference Image for Profiling” button and save it as something like target.tif. Leave the “Apply white balance” box checked. RawTherapee will save a linear .tif without any color management. Input and output profiles are both ignored; neither choice affects the image, and there is no embedded profile.
[Versions of RawTherapee prior to 4.2.131 would not apply transforms at this step. If you need to adjust the reference .tif, be sure to do it in 16-bit without any color management. In RawTherapee, open the .tif, set the (Neutral) profile if necesary, and use the straighten and crop tools. Then under Color Management, make sure no Input Profile is specified (not “No profile”; “Use embedded, if possible” should work), set Output Profile to “No ICM: sRGB Output,” and make sure that Output gamma is set to “default.” Another editor that can do this is Fotoxx.]
Now we get to use Argyll. Copy ColorChecker.cht and ColorChecker.cie into the working folder with target.tif to make things easier. First we run scanin:
I won’t bore you with the meanings of all these, they are explained in the documentation. Of note, -G 1.0 indicates that the gamma encoding of the image is 1.0, thanks to RawTherapee. diag.tif is the name of the diagnostic output image that reality-checks the patch recognition. target.ti3 which contains the measured patch values is also created in the working directory.

If the target was measured successfully, we now run colprof to create the .icc profile:
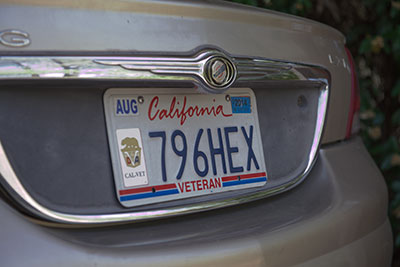
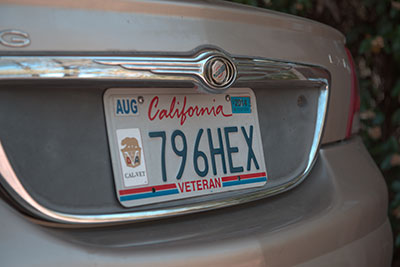
Life is short, and art is long; go for high quality, -qh. (Per the documenation, -qu, ultra, is a test; don’t use it.) The algorithm switch needs some explanation; I used -am (matrix) as it is recommended for linear, raw images, and it seems to be the best. The ColorChecker Passport software creates .dcp profiles with color lookup tables (cLUT’s); more about that later. For now, note that 24 patches is evidently not enough for Argyll’s tables; images processed with cLUT profiles tend to have blown, pink highlights, like the first one in the second row below (note the chrome on top and the right side). Using gamma and shaper curves appeared to make no difference. I did not attempt to scale or otherwise manipulate the target or profile to adjust the white level; the -u swich is said to be used for targets whose white point is not expected to be media white, and allows for further adjustment of the processed image.
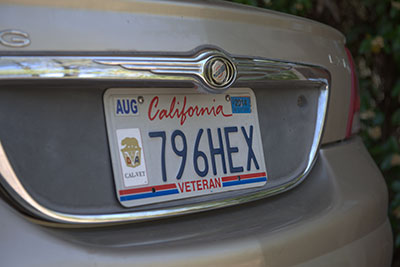
As you can see below, images processed with .icc and .dcp profiles are reasonably similar, especially compared to the image without any color management; but they are not as similar as the images taken with different cameras and processed with different raw processors and operating systems using .dcp profiles on the zone system calibration pages. In fairness, a target with more patches may have helped; but note that the .dcp profiles were made from the same 24-patch target. (All four of the images below were white balanced on the spot below the middle of the word California; there was no other manipulation.) My assessment: if you need .icc camera profiles for your application, or can’t or won’t use Wine for whatever reason, Argyll in all likelihood will meet your needs. This is especially true if you are using controlled lighting. But for real-world photography, I would recommend using the ColorChecker Passport software in Wine as described on the calibration page above, as I believe that .dcp technology is superior when the light is a moving target.

Display profiling
Profiling output devices is a two-step process: calibration, then characterization. Calibration is like setting the hour and minute hands of a watch to NIST atomic clock time; characterization is like then observing, “it’s running about 8 seconds fast.” For a display, one first uses the controls to get the brightness and color balance into the ballpark. Then the profiling harware and software measure the output and further calibrate the system, then create an .icc color profile which characterizes the results.
Profiling the display with Argyll appears to be successful. I profiled the Dell E2014H that I use for everyday browsing, and the result seemed to be a little better than the one I got using i1Profiler last year, which had undoubtedly suffered from drift. If I had been more successful at printing, I would have profiled the U2410; but as it is, I let it go for now.
Creating a profile in one step
One first runs dispcal to see if the measurement device is detected:
I tried using my old Monaco Optix DTP94 instrument; it was initially recognized, but then all I got was, “Instrument Access Failed - Not expected instrument model.” [Graeme Gill says that this may be due to known bugs in Argyll version 1.6.3 that should be fixed in the next release.] I subsequently used the i1 Pro without any major problems; one time, in the middle of a measurement, I got, “Sample read failed due to communication problem. Hit Esc or Q to give up, any other key to retry:”, and it continued on. The -J switch is unnecessary as the software automatically requires calibration of the instrument before each use. The -y display type switch was ignored.
Begin by turning off any existing display profile:
Then set your display’s controls to the factory defaults. For me, that means brightness and contrast at 75, and red, green, and blue at 100. This seemed too bright so I turned the colors down to 75. On the U2410, the defaults are all 50. With an LCD display, you will probably not adjust the contrast any further. Finally, adjust your computer’s power managment policy to keep the display from shutting down.
From here, one may take the quick single-step route, or the more complex multi-step one. For a simple profile for web browsing and such, just run the following:
Note, Argyll’s display measurement process is rather on the slow side; only use -qh if you have a real need and time to wait. The “standard” for display profiling is 6500 K and 120 cd/m2; I believe these are too blue and bright as noted below. Importantly, -gs sets the gamma to that of the sRGB profile, so web graphics will display as expected. And -o tells Argyll to go ahead and create the .icc profile without further ado.
For a printing workflow, I use 5500 K and 80 cd/m2. Few people are likely to view your prints under 6500 K lighting; manufactures use it because it looks attractive in bright showrooms, or maybe because it makes PowerPoint presentations look good. 5500 K is just about the most neutral “white,” and I for one have adopted it as a standard for display, working space, and print. A rather dim 80 cd/m2 brightness is often disparaged as being appropriate for working in a cave; but if your prints always seem too dark, I would propose that your display is too bright; turn it down. And one probably would not want to use sRGB gamma for printing as it gives a little boost to the shadows, which your printer will probably not do. After you get used to it, the images that you make for printing may look terrible in a browser, especially if you are using a wide-gamut display; but that is o.k. because those are separate workflows. So for a better print workflow profile, use:
After calibrating and positioning the measurement device, one gets the following, along with some measurements:
Steps 2 and 3 are what worked for me. I think it would make more sense to set the brightness first, then the white point; but I did the steps in order, then repeated them, and it all seemed to work. First, we set the white point (press 2):
Adjust the RGB controls to get x and y in the ballpark, and minimize DE (delta E). The plus and minus signs after R, G, and B in the output above tell you what to do; in this case you would start by lowering the blue control. They will never be perfect, just do your best. Remember, there’s a characterization step after this.
Next, set the white level (brightness; press 3):
Once again, follow the plus or minus sign to raise or lower brightness to as close to the the target value as it gets.
When you are finished making the adjustments, press 7 to continue. If you have used the -o switch in the command, you will get an .icc display profile, along with a .cal calibration file for use in subsequent steps, if any.
Now what? First, remember the brightness, contrast, red, green, and blue settings that you found, as proper working of the profile depends on them. Then, copy the profile to a folder with public access, such as ~/.local/share/color/icc. Activate the profile:
As long as the profile is in a location with public access, you can use this command to create a startup application entry that runs dispwin and sets the profile automatically. The -I switch, which is intended to install the profile as the system default, did not work for me.
To inactivate the profile for comparison:
To measure the final result:
More advanced profiling using multiple steps
To exercise more control over the process, one may use targen to create a set of custom test values, based on an existing profile if possible (such as a simple one created in the previous step):
There is a touchy-feely aspect to patch generation. You may want to optimize your display for black-and-white images, for example. -g33 includes 33 evenly-spaced gray steps, and -f300 brings the total to 300 by adding full spread patches. (Note that the brief description of -f in the documentation says, “Add iterative & adaptive full spread patches to total,” which is a little ambiguous; the complete documentation correctly indicates that, “full spread patches will be added to bring the total number of patches including those generated using the -e, -s, -g -m and -b flags up to the specified number.”) Various options may be chosen for the distribution of the patches, including spacing, and emphasis on the neutral axis and shadows. The result is a .ti1 color patch file which is read, together with the .cal calibration file generated in the previous step, with dispread:
This creates a .ti3 target data file. Now we use colprof as we did when creating the camera profile:
This will create a large, cLUT-based profile, which I have come to appreciate from using i1Profiler.
The -S switch specifies a color profile for gamut mapping, and the -c and -d switches specify the associated input and output viewing conditions. The rationale for using pre-computed gamut mapping is found on the Gamut Mapping page. And the ICC Specification ICC.1:2001-12, File Format for Color Profiles (Version 4.0.0), adds: “The intent of requiring tags with profiles is to provide a common base level of functionality. If a custom CMM is not present, then the default CMM will have enough information to perform the requested color transformations.” I used ProPhoto.icm as the gamut mapping profile because it is big, and it or a variation of it is my usual working space. The resulting contrast ratio was 428:1, compared to 382:1 when using a printer profile. If a mapping profile is not specified, the resulting profile will only support the perceptual rendering intent, which may be o.k.
Concerning the conversion algorithm choices: matrices and shaper curves use mathematical equations to convert one color to another. In real life, the conversion is usually not simple, so the curves have to be either rather crude approximations of reality, or impossibly complex. A color lookup table (cLUT) is a set of data points; it is more of a brute-force conversion, like a bar graph as opposed to a mathematical equation. It can be made as fine-grained as one wants it to be (in-between values are interpolated), and in real life is often a better approximation of reality than matrices and curves. Printer profiles should always be cLUT-based. As described above, I have found that matrices work better for Argyll’s camera profiles. For display profiles, each method has its pros and cons; I find that large cLUT profiles are more accurate for print color matching.
Printer profiling
Printer profiling similarly involves both calibration and characterization. Some printers incorporate a linearization utility that standardizes the output. Argyll can do this with printcal, which I did not try. The remainder of the calibration process involves the selection of paper and printer settings.
I hate to say it, but printing in Linux is still rather in its infancy, and resources are limited. I began by using the Gutenprint drivers that came with Korora; unfortunately, I only own one printer that can print with it: a small four-color Canon iP3000. And I discovered during this process that the only supported print mode is Plain Paper. I was unable to get the Pro9500 Mark II to work at all. (I didn’t try the iPF6350.) So I made the best of it, with a modest degree of success. (I then had better luck, along with some more problems, with TurboPrint as described below.)
First, we need a patch set. The targen page includes a list of measurement devices and the number of patches that they use with different sizes of paper. For the i1Pro, that’s 462 patches for an 8.5×11.
Use your feelings to decide how many patches of what kind to choose; the above include 2 white and 2 black, ramps of 16 steps of all three channels plus gray, along with full spread patches to total 462 for one sheet. (If this were intended to be a high-quality profile, we would undoubtedly use several sheets.) Once again, this generates a .ti1 color patch file. Now we need to format these patches into an image for printing. Argyll is something of a marvel and has all this built in:
The -T tag produces .tif output rather than PostScript; I used this as I virtually always print .tifs. A .ti2 file is also generated that contains the color and layout information for the patch set; it is important to keep track of it for reading the patches.
From here on we will describe the process of printing the patch set and using the printer profile. Below, I have appended an update for 2021 using GIMP and a Brother printer with a Linux driver.
Gutenprint
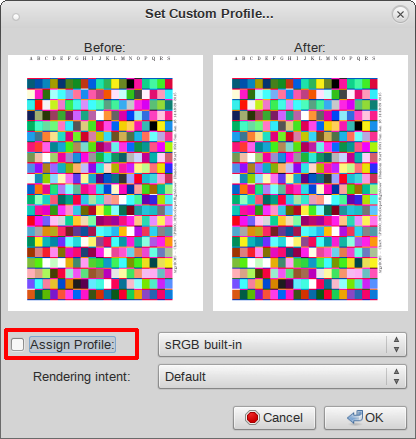
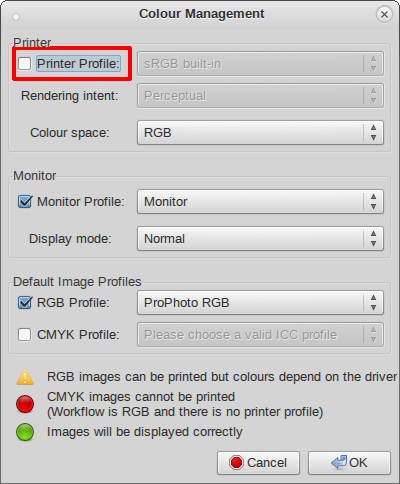
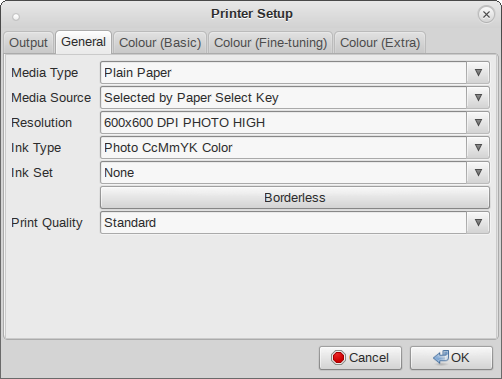
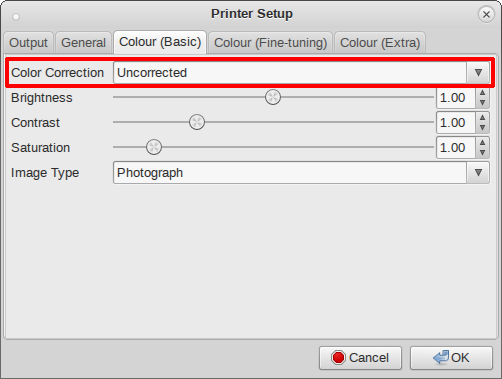
Now comes the first tricky part: we must print the patch set using parameters selected to optimize the print quality, but without applying a profile or any other color management. I used PhotoPrint for this as it is 16-bit and fully color-managed. It feels like a work in progress, and will shut down without warning if you do anything wrong, but it seems to get the job done. Below are the settings that I used. The most important ones are outlined in red; be sure that no profile is assigned to the image or specified for printing, and tell the printer not to do any other color correction. Also, in the menu, set Layout to Manual Size. The rest of the settings represent calibration, and must be used exactly as-is whenever this profile is used. Having to use the Plain Paper setting is very unfortunate; it results in a fast, dithered output that is not much to look at. Any other setting results in a greenish-and-white, distorted image that implies that the other modes are just not supported. Using the 600×600 DPI PHOTO HIGH resolution with the other settings maximizes the quality, to the extent that it is able. And even though this printer’s ink type is not CcMmYK, that is the only choice with this resolution setting. (We are winging it here . . . .)
Let the print dry, preferably overnight, due to the possibility of dry-down. Then comes the second tricky part: reading the patches. The process is fairly straightforward, except that in my case, the unit does not beep as it does using i1Profiler. So the procedure is: press the button, wait a second for an imaginary beep, slide the unit, release the button, then look at the terminal output to make sure that the row was read; if it was not, press the spacebar and read the row again.
The measurements are stored in a .ti3 file. Now we again use colprof to create the profile. As before, I used ProPhoto.icm as the gamut mapping profile; see the note about it at the end of the display section above. [Graeme Gill disagrees here, and recommends creating a source gamut that actually reflects the gamut of the working images. “The best way to do this is to create a source gamut from each image or a set of images using tiffgamut. Using a device link workflow would probably be faster for this approach, since it avoids creating a lot of unnecessary tables each time. A simpler alternative is to choose more realistic source gamut such as AdobeRGB or sRGB, even if the storage format uses ProPhoto.”]
The default illuminant is D50; D55, or 5500 K, is not provided as an option. I used the DaylightSeries.xls spreadsheet from the Rochester Institute of Technology together with the daylight components data in 204.xls from the CIE to create D55 custom spectrum files, which are analogs of Argyll’s ref/D50_X.X.sp files.
One more step remains before using the profile for high-quality work: determining output levels as described on the BTDZS workflow page.
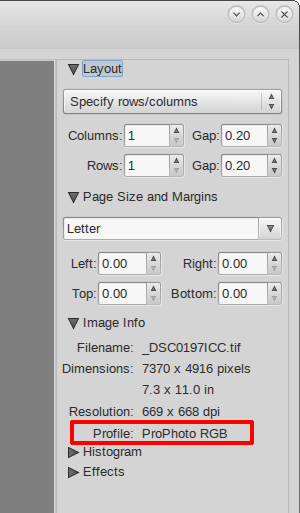
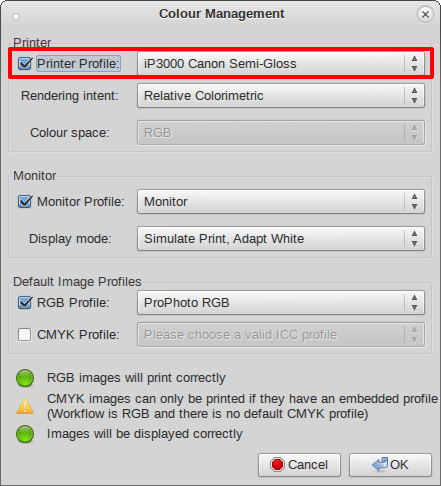
For printing real images, the only differences are that the image will have an embedded working space profile, and we set the printer profile in the color management dialog. (I also set the soft-proofing display mode.) Everything else stays the same.
The final result. This print is something of a worst-case scenario, using Office Depot High Gloss paper and Amazon.com bargain ink profiled as above. The profile clearly works, although the blues are a little off:
TurboPrint
Is there any other way to print in Linux with a printer whose manufacturer has not provided a driver? The proprietary application TurboPrint comes with drivers for many more printers than Gutenprint does. Additionally, they include things like ink levels and head maintenance, which is essential for higher-quality printers. Unfortunately, PhotoPrint does not work with TurboPrint. The latter does come with a GIMP plugin, which in that case limits it to 8 bits (GIMP 2.9, under development, may finally use 16 bits!) CinePaint and Krita are both color-managed and 16-bit; the former does not print with TurboPrint; the latter does, but its printing is buggy, as it does not seem to be able to distinguish the image size from the page size. RawTherapee is 16-bit but, unfortunately, has no printing capability. PhotoLine is 16-bit, and version 19 is color-managed in Wine; it is able to use the TurboPrint driver but not the full functionality including media profiles. (In reality, 16-bit is superior for image editing, but probably not really necessary for printing the final image; color management is much more important.)
So all things considered, I gave TurboPrint and GIMP a try. I downloaded and installed the former from turboprint.info without any problems. It comes with a fairly thorough .pdf manual. You need to add your printers to TurboPrint; they will be named things like iP3000-TurboPrint and Pro9500II-TurboPrint so you can identify them. Then comes profile creation. TurboPrint’s “printer profiles” are actually media presets to which you assign an .icc profile. After naming a new profile and choosing the paper and dpi resolution, the application offers to print a row of test images that will allow you to set an ink limit; it’s an interesting touch. The default is 250; I found 175 to be plenty. The type of paper and ink are also specified in the profile.
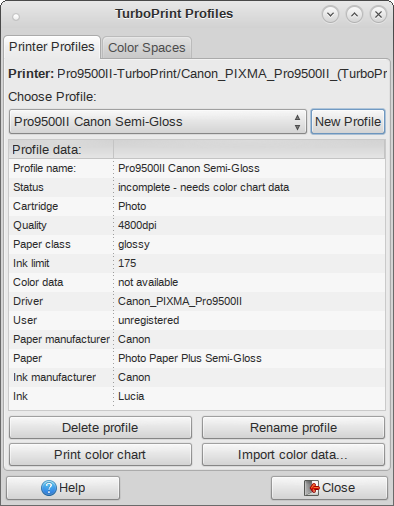
At this point, the .icc profile has not yet been created. The “printer profile” is unmanaged, and we will use it to print the patch targets. For the Pro9500 Mark II, I made a two-sheet target. This one uses relatively more grays:
This time, we are going to create an 8-bit target image for GIMP (the lower-case -t):
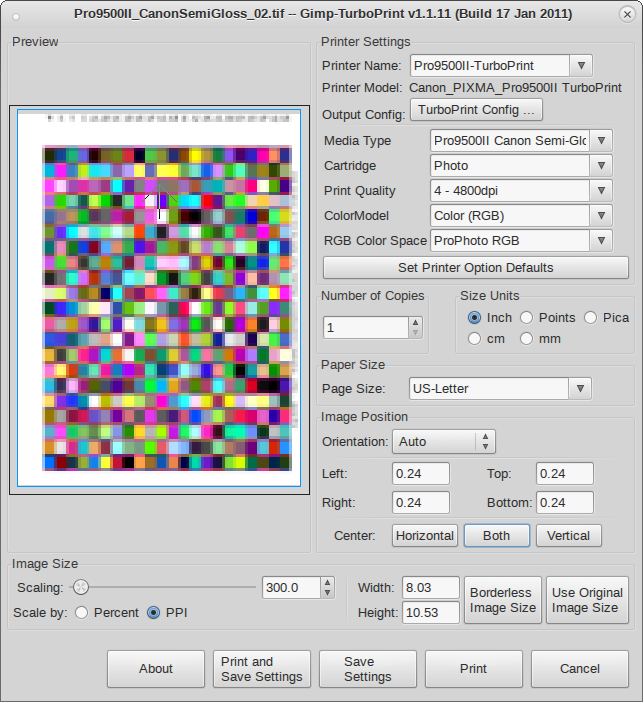
Amazingly, TurboPrint supports other media besides plain paper! In GIMP, one prints with it via File — TurboPrint. The media type/paper is the printer profle that you created. All details of the configuration must be kept the same every time, including resolution (which does not always default to that built into the profile) and dithering.
TurboPrint must be told the print’s color space, which means that almost anything other than sRGB must be installed via the Control Center. But in this case, there is no destination profile, so the source space is ignored even though one is specified on the main panel (the Color tab in the configuration menu, which also specifies the source space, is grayed out). Be sure to properly scale the image. This is how we print our unmanaged profiling target:
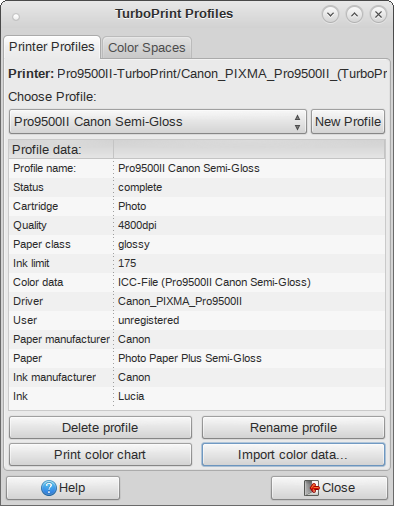
Read the patches in the usual way. Once you have created the .icc profile, go back to the Control Center, open the printer profile, and import color data in the form of the .icc file. The profile status will now be “complete” and ready for color-managed printing. In GIMP, one prints in the same way, except that now there is a destination profile which needs a source color space. In this case, the unmanaged print made on Canon Semi-Gloss was not too far off:
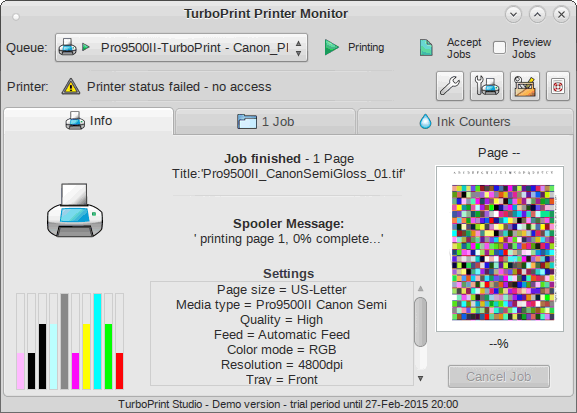
Sounds good so far . . . . Now for the thorns among the roses. There were a few major kinks in the TurboPrint workflow. When printing with the iP3000, the printer installation twice became corrupted; TurboPrint’s print dialog in GIMP all of a sudden had a button that said “Gutenprint Config” instead of “TurboPrint Config,” and a number of the other controls had disappeared. I had to uninstall then reinstall the printer with a different name to get it to work again. More seriously, the Pro9500 Mark II would only print one print at a time, after which the blue light would blink and it would neither print nor shut down. The TurboPrint status monitor would say things like, “Timeout - communication to printer broken,” then “Printer status failed - no access,” then “Printer not connected or switched off” (it wasn’t). I had to unplug the printer and plug it back in to get it to print again, which means it had to go through its maintenance cycle EVERY SINGLE TIME. None of the inks started out low, but I had to replace three inks after printing several sheets of test images and a two-sheet profiling target. Needs work . . . .
At the expense of more ink, I made a few borderless 8.5×11’s with the Pro9500 Mark II, and the quality was amazing; the colors and values were pretty much dead-on, a tribute to Argyll’s display and printer profiles. I then switched to Windows 7 and made some more prints using the new .icc profile with Photoshop and Canon’s driver; there was an obvious difference between these and the former prints, and between print and display, indicating that the .icc profile should be considered specific to the driver. (Argyll’s display profile seems to work just as well in Windows; it’s the same graphics card.)
There you have it. We have plenty of room to grow here; the biggest need at present is printer drivers and 16-bit color-managed applications to run them. But the bottom line is, let there be Linux!
2023 Update: GIMP and a Brother Linux printer driver
GIMP 2.10 supports 16-bit images, and more printers now either have their own or a CUPS Linux driver. With this combination, color-managed printing in Linux is much easier. First, print the patch set from GIMP without color management:
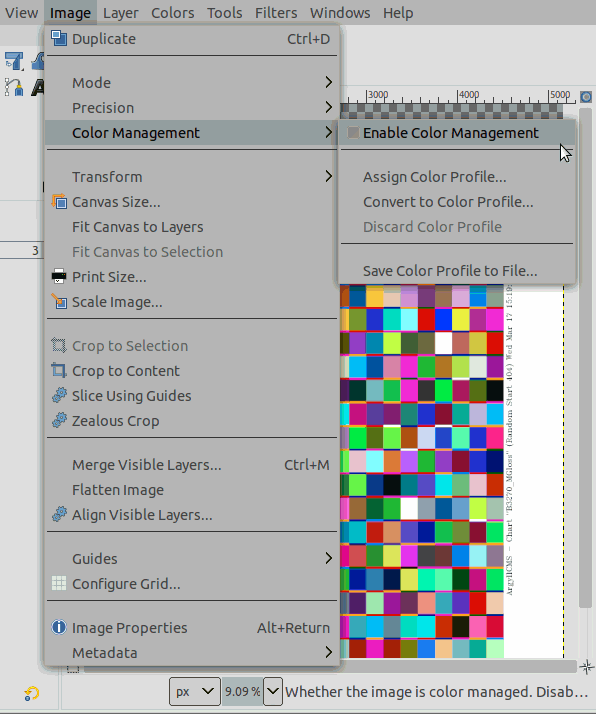
1. Turn off color management via Image — Color Management — uncheck Enable Color Management, and disable any color managment in the printer.
2. Then print the image but put the job on hold (File - Print, go to the Job tab, Print Document: On hold).
3. Run lpstat to see the name of the print job.
4. Then run lp -i <name of the print job> -o cm-calibration=1 -H resume to turn on calibration mode for the print job and resume printing.
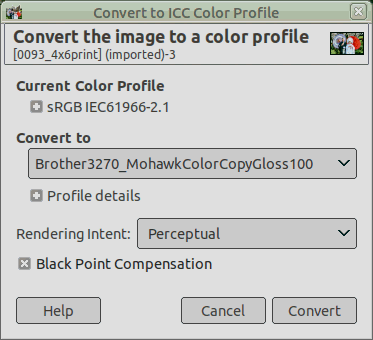
Follow the instructions above for creating the printer profile. Then, if the printer driver is color-managed, use the profile. If not, convert (a copy of) the image to the printer profile in GIMP before printing it (Image — Color Management — Convert to Color Profile). (In the Brother printer driver, Color Mode must also be set to None.)
Beyond
Argyll is available for Windows and Macintosh as well. Because of the need for new Windows USB drivers for some measurement devices, and because the Linux command line seems more friendly in general, it may still be easier to use the program in Linux even when profiling a Windows or Mac computer; one simply does the printing with the manufacturer’s driver and Photoshop, for example, and does everything else in Linux. Here are the commands for generating a 24×11-inch i1Profiler target:
Why we don’t use AdobeRGB anymore
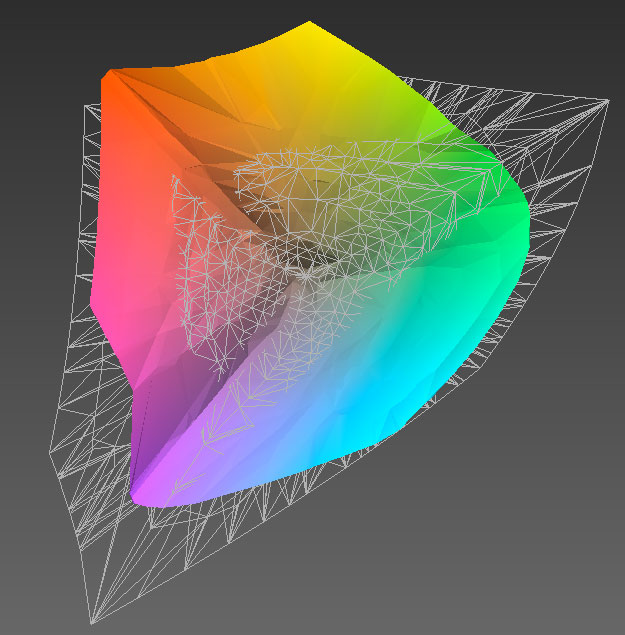
The wire mesh is the Adobe RGB gamut, and the solid figure is Ilford Prestige Gold Fibre Silk on the Canon iPF6350.
Resources
D55.zip, custom spectrum files for specifying the D55 (5500 K) illuminant when using colprof to create a printer profile.
Or try the custom spectrum file generator.
Generating custom Argyll Color Patches.
 |
Tom P. Ashe, Color Management & Quality Output: Working with Color from Camera to Display to Print (The Digital Imaging Masters Series)
“Since a setting of 5000 K can result in a white point that is too yellow, 5500 K is often used as a good intermediate white point, and was selected in Figures 4.24 and 4.25.” [Page 76, referring to ColorEyes DisplayPro and X-Rite i1Profiler software.]
|
 |
Bruce Fraser et al., Real World Color Management |
 |
Tim Grey, Color Confidence: The Digital Photographer's Guide to Color Management |
 |
Uwe Steinmüller & Jürgen Gulbins, Fine Art Printing for Photographers: Exhibition Quality Prints with Inkjet Printers |