
An Introduction to Photo Editing with PhotoLine: Miscellaneous Adjustments and Techniques
Dehaze
The Dehaze filter is intended to remove atmospheric haze and associated color casts. But it may be used to enhance any image, especially those with a washed-out appearance. Apply it via Filter – Quality – Dehaze. Start with Calculate Haze Color checked, and adjust Size until the hue of the color cast looks right (ignore everything else). Then uncheck Calculate Haze Color and adjust Size some more; higher values reduce halos as well as the overall effect. Then if the resulting color cast adjustment is too intense, double-click the Haze Color field and decrease the saturation. Adjust the opacity of the layer to vary the intensity of the effect.
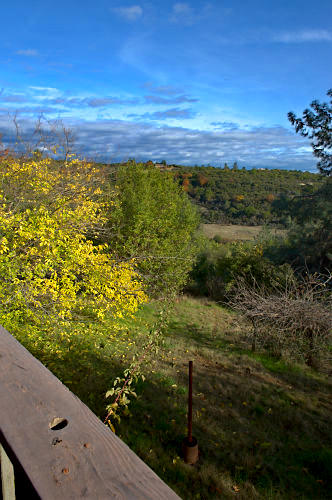
Dehaze always darkens the image, so further adjustments such as a layer mask or curves may be needed. The image below has the sky and deck rail partially masked. It may help to add a curves layer below the dehaze layer, so the image can be lightened or contrast adjusted before dehaze is applied.
Filters that include a blur radius sometimes do not work well with very large images (7000+ pixels). The maximum dehaze size is 200 pixels. A typical size value is 1-2% of the image diagonal; for this image, 10 looks about right. So for a 7370×4496 image, the size would be 147, well within the range of the filter.
|
|
Light/Shadow and Exposure
Another tool that may come in handy is Light/Shadow. Note that this does not work like the Shadows/Highlights filter of some other programs. Start with Layer – New Adjustment Layer – Light/Shadow. Reset the sliders to zero if necessary, then gradually increase the values to lighten the shadows and/or darken the highlights. Width and Gamma have different effects; try them both. Neither actually adjusts the tonal width of the adjustment, and they are not limited by the image size.
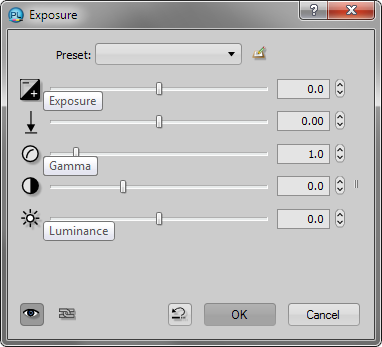
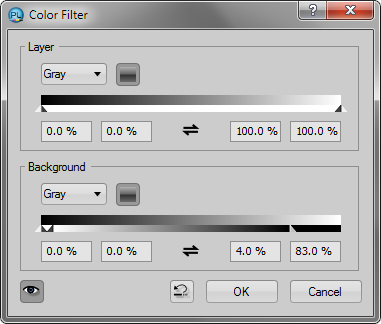
Similar results may be obtained with an Exposure adjustment (Layer – New Adjustment Layer – Exposure) using the Exposure, Gamma, and/or Luminance sliders and a color filter set to target the highlights or shadows. Right-click the layer on the Layers panel, select Color Filter, and slide the black half of the upper Background slider all the way down for the shadows, or the black half of the lower slider all the way up for the highlights. Move the white half of the slider to further limit the adjustment. (For more about color filters, see Luminosity Masks and Color Filters below.)
 |
 |
Shadows/Highlights
Duplicating a conventional Shadows/Highlights filter is complicated but it can be done. First, copy the image to the clipboard (Edit – Merged Copy). Next, create a curves layer and use Tool – Change Channels to paste the clipboard to the layer mask (Source is Clipboard, Destination is Black; see the Advanced Selections and Masks page for details). If you are lightening the shadows, invert the mask via Tool – Color – Invert.
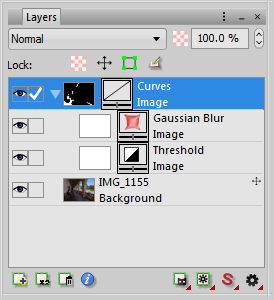
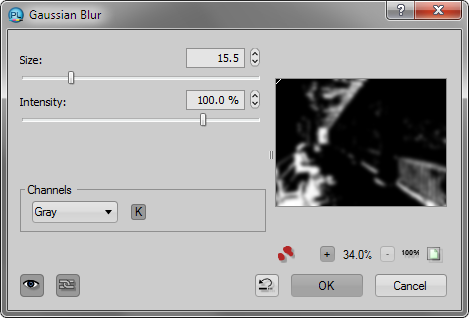
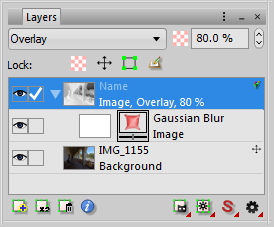
Now create a child Threshold layer via Layer – New Adjustment Layer – Threshold, and check the Group With Previous Layer icon (the little chain link). Last, reselect the curves layer and create a child Gaussian Blur layer via the same procedure.
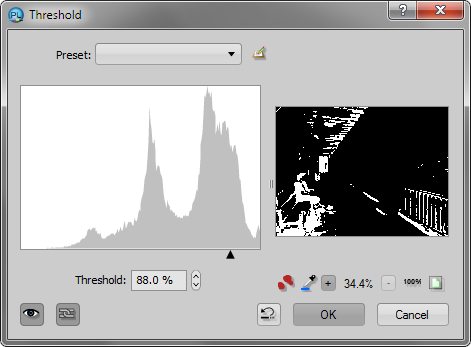
You should end up with the Gaussian Blur and Threshold layers as children of the curves layer, in that order. (It has to look exactly like the picture below.) Threshold is what converts the luminosity mask into a shadows or highlights mask; adjust it to change the tonal width. Adjust the Gaussian blur size to change the blur radius, and the curve to lighten the shadows or darken the highlights. (This is one instance where the image preview on the adjustment dialog may be helpful.)
Increasing midtone contrast may be accomplished by creating two layer masks for a curves layer and adding child Threshold and Gaussian Blur layers to each. Mask the highlights with one mask and the shadows with the other, and use curves to increase the contrast of the unmasked midtones. (If you really get into this, you can save these steps as actions.)
The trouble with this method is the 255 pixel limit to the Gaussian blur radius. (There are technical reasons for this.) The desired blur radius for Shadows/Highlights may be 5-10% of the image diagonal, which for a 7370×4496 image would be over 400 pixels. If you are determined, you can create the mask using a reduced copy of the image, merge the adjustment layers, enlarge the copy back to the original size, copy the mask to the clipboard, then paste it to the mask of an adjustment layer in the original image.
 |
 |
|
 |
Contrast Masking
The following technique for reducing image contrast is described on the Luminous Landscape page and elsewhere (good test image at gimp.org). Start by duplicating the background layer or making a stamped copy layer (Edit – Merged Copy, Edit – Paste as Layer). Convert the duplicate layer type to Gray on the Layer palette, then invert it via Tool – Color – Invert. Now change its blend mode to Overlay. Shadows are lightened and highlights are darkened.
Reduce the layer’s opacity to reduce the effect. To restore fine detail and modify edge transitions, create a child Gaussian Blur layer as described above. To further modify the effect, create a child Curves layer, or use a color filter to create a shadows or highlights mask.
A very small Gaussian blur radius has a sharpening effect and can increase detail; a very large radius has a smoothing effect. Once again, the latter may exceed the limits of the adjustment for very large images.
Side note: the Very High Radius Contrast Mask and Very High Radius Shadows/Highlights plugins were designed to accomplish the above effects with very large images.
Luminosity Masks and Color Filters
Luminosity masks may be used to limit the effect of an adjustment to highlights, midtones, or shadows, or to blend images with different exposures. This technique differs from a Shadows/Highlights filter in that the latter uses a blurred mask, similar to dodging and burning, while the former simply applies the effect based on the value of each pixel. Badly done, a luminosity mask may result in flattening or inversion of the overall image curve, resulting in loss of detail or solarization-like effects.
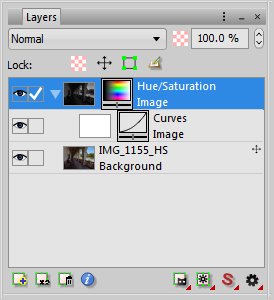
To apply a luminosity mask, create an adjustment layer, then copy the image to the clipboard and use Tool – Change Channels to paste the clipboard to the layer mask as previously described. You now have a highlights luminosity mask; for a shadows mask, invert the mask via Tool – Color – Invert. To further modify the mask, create a child curves layer (select the adjustment layer, create the child layer via Layer – New Adjustment Layer – Curves, and click Group With Previous Layer beside the eye icon). Darkening a highlights luminosity mask, for example, will more sharply limit the effect to the highlights.
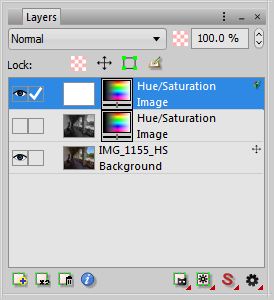
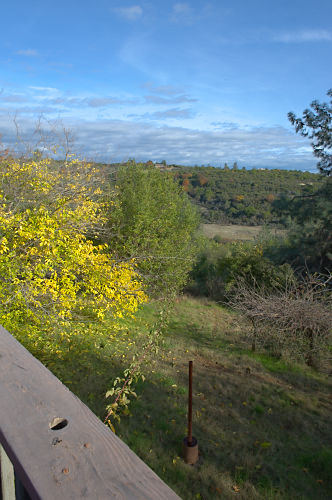
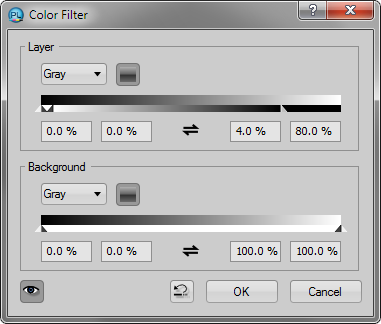
Having said all this, you can achieve a luminosity mask effect more easily by using color filters. In the image below, a Hue/Saturation filter was applied to the highlights using both a color filter and a luminosity mask; the results are indistinguishable.

|
 |
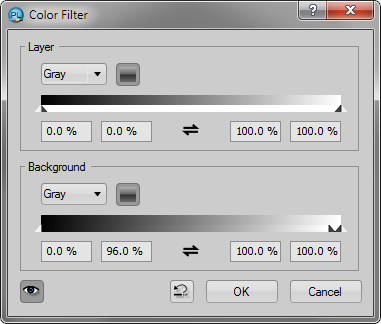 |
Here are examples of color filters that create the basic types of luminosity masks. Note that limiting the effect with the color filter sliders is slightly different from applying a curve to a mask.
| Highlights: |  |
 Highlights2 mask |
| Highlights2: |  |
|
| Shadows: |  |
|
| Shadows2: |  |
|
| Midtones: |  |
|
| Midtones2: |  |
|
| Arbitrary: |  |
Below is an example of manual HDR blending using a color filter. The overexposed image was layered on top of the original, and a color filter applied (to the upper layer this time) to limit the effect to the desired shadow areas.
 |
|
 |
 |
Next: printing

