An Introduction to Photo Editing with PhotoLine: Resizing, Cropping, Sharpening, Spotting
Resizing
When resizing, you mainly need to pay attention to whether you are resizing the entire image or just a layer. To resize the image, click Layout – Document – Scale Document (or Layout – Page – Scale Page). To scale a layer, use Layer – Scale Layer. Note that these all call up the same dialog, with Layer, Page, or Document preselected. Several modes are available, including Normal (pixels), Percent, and Resolution. Bicubic interpolation is often blindly recommended as it and some of the more advanced modes also sharpen the image; but for reduction, Bilinear interpolation followed by halo-controlled sharpening (discussed below) can sometimes produce superior results. And images always need sharpening after being resized. Lately, the method I have been using for both reduction and enlargement is Mitchell-Netravali. See A comparison of PhotoLine’s interpolation methods for more information.
To change the document (“canvas”) size without resizing the image, use Layout – Document – Change Document Size. New Size mode sets the new size in pixels; in Resize mode, the document is resized by the pixel values. You may drag the image thumbnail around to position it inside the document, or use the Alignment buttons.
Cropping
The Crop tool is also a straighten and resize tool. Note that if you just want to crop the existing image without doing anything else, make sure that width and height in the Tool Settings panel are empty or zero, and Resolution is unchecked. The crop margins do not snap to the edges of the image by default; for this, hold down the Alt key (Option key) while dragging the crop margins. If you change your mind and want to cancel the operation, right-click and select Deselect. To perform the operation, double-click inside the crop margin, click Trim Document on the Tool Settings panel, or right-click the image and select Crop Tool.
General sharpening concepts
Sharpening is usually performed at several key points in an image workflow, including after capturing an image, after resizing, and before printing. Sometimes images are creatively sharpened and/or blurred as well, such as to emphasize the subject vs. the surroundings. There are several ways to sharpen an image, and different methods are more applicable to different situations. The most common method is unsharp masking, which sounds counterintuitive as a method of sharpening but actually involves subtracting a slightly blurred copy of the image to leave behind a sharpened result. The dark side of a blurred edge is darkened, and the light side lightened, to increase the impression of sharpness. But as the effect is increased, visible halos appear, and the image will look oversharpened. Halos are a major issue because small sizes and high intensities are used for conventional sharpening. (High sizes and low intensities, or HiRaLoAm, are used to increase the local contrast or “clarity” of the image. I would refer you to the Very High Radius Unsharp Mask plugin for this as it has some advanced features.) It is possible to reduce the impression of halos by altering the mix of lightening and darkening that occurs in the sharpening process, as light halos tend to be more objectionable than dark ones. Other factors to consider are that sharpening tends to emphasize noise, that color noise is more objectionable than luminance noise, and that the visual impression of sharpness is almost entirely based on the luminance component of an image, not the color. For these reasons it is usually best to sharpen only the L channel. Another technique that may improve the result is to use an edge mask that permits only sharpening near edges, and prevents increasing noise in smooth areas such as the sky.
The second image below has a 20 pixel Gaussian Blur applied to both the a and b channels; the third has the same blur applied to only the L channel.
|
|
|
Digital unsharp masking is usually based on a Gaussian-blurred version of the image; the effect of the blur takes the shape of a bell-shaped curve on either side of an edge. Another type of sharpening is called deconvolution, which technically requires knowing how the image was altered during its passage through the optical pathway (“convoluted”), and mathematically reversing it (“deconvoluting” or “deblurring”). Exact knowledge of the image convolution is seldom available, and deconvolution is sometimes disparaged for this reason. However, a number of algorithms have been developed that may approximate true deconvolution, and produce better results under certain circumstances than Gaussian unsharp masking. One way to approach deconvolution is the use of a disk blur rather than a Gaussian blur, as if the image had been convoluted into little circles by its passage through the aperture diaphragm (my theory anyway). The results of this type of sharpening are much smoother than Gaussian-blurred unsharp masking, and the halos are much less noticeable; but the effect may not be strong enough for some purposes. One guiding principle is that deconvolution is more applicable early in the workflow, especially first thing after capture; and that unsharp masking becomes more useful later on, especially before printing.
The only application that I know of that provides unsharp masking, deconvolution, halo control, and edge masking is RawTherapee. Its Richardson–Lucy deconvolution may be the best choice for raw capture sharpening. Otherwise, I recommend sharpening with a plugin. I made the Fine USM Sharpen/Deblur filter with these features in mind; it can do what other sharpening plugins can do, and a little more; and of course it works in PhotoLine. The disk deconvolution and edge masking steps may run slow with large images.
The image that we have been working on has not been sharpened; I would normally have done it after processing the raw image, and again after resizing. Here I have applied mostly deconvolution, with a small amount of unsharp masking as well. Compare the final image with the original.
|
Plugins like this are generally appled to image layers. (Another option is to use a placeholder layer; it has its pros and cons; more about this later.) You may want to duplicate the background layer and sharpen it so that adjustment layers are still on top and active. Otherwise, select the top visible layer, use Edit – Merged Copy, then Edit – Paste as Layer. This creates a “stamped” image layer on top of the other layers. Any adjustment layers underneath are now hidden by the image layer and no longer affect the image.
You may duplicate the background layer by right-clicking it in the layer list and selecting Duplicate Layer; but the results are sometimes unpredictable when applying filters to the duplicate. It is best to select it, then use Edit – Copy, Edit – Paste as Layer.
After applying a filter or otherwise adjusting an image layer, you may mask it as we did with adjustment layers. Select the relevant layer, then use Layer – Layer Mask – Create, or click the Layer Mask button at the bottom of the Layers panel. A layer mask is created as a child layer of the image layer.
 |
Unsharp Mask Sharpening with PhotoLine
Having said all that, here is how to sharpen with PhotoLine. Three types of unsharp masking are available, which unfortunately are not well documented. They may be applied to an image layer via a filter (Filter – Sharpen), or, amazingly, via adjustment layers (Adaptive Sharpen, Unsharp Masking, and Sharpen). For all three, Size refers to the diameter of the Gaussian blur, and Intensity is how much of the effect is applied.
The filter called Unsharp Masking seems to be identical to Sharpen, with the addition of a virtual mask to limit sharpening to high-contrast areas. The Threshold control adjusts the latter effect, the limiting being none at 0 and maximum at 100. Adaptive Sharpen is similar except that it “uses all color channels for calculating the contrast and is not filtering channel by channel”; the documentation is not clear at this point. It sometimes produces artifacts at high values, such as fringes around edges.
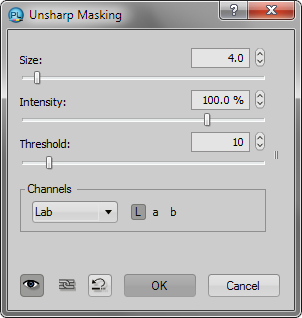
So we will focus on the Unsharp Masking adjustment (Layer – New Adjustment Layer – Unsharp Masking). View the image zoomed to 100% for sharpening. Set Channels to Lab and select only the L channel. Start with a Threshold of 0. For web images or those that will otherwise be viewed on-screen, a Size of 2.0-4.0 seems to work. This is a higher value than what other applications call “radius,” which itself is a description rather than a measurement as the Gaussian blur does not have a well-defined radius. See PhotoLine’s unsharp masking size parameter for more information.
One way to find the right value is to raise Intensity to the maximum, then raise Size until the halos start to visibly separate from the edges that they surround; then reduce the Intensity back to 100% or so. Now gradually increase Threshold, comparing the sharpening of smooth vs. detailed areas.
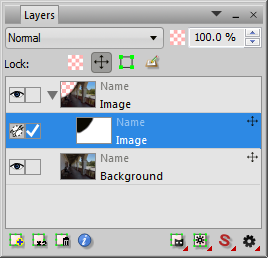
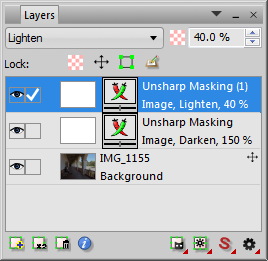
To control halos, create an Unsharp Masking layer as above, then duplicate it (right click – Duplicate Layer). Set the blend mode of the original to Darken, and the copy to Lighten. Reduce the opacity of the Lighten layer to 0%, then gradually raise it to just before the halos start to become noticeable. You may then be able to increase the opacity of the Darken layer above 100% to sharpen a little more without worsening the halos. For our image, 150% for Darken and 40% for Lighten looks good.
 |
 |
For images that are to be printed, several more factors must be taken into account. First, an image printed at 300ppi is only about 1/3 the size of the same image on screen, which is probably something like 96ppi. (You can view the image at the printed size if you measure the screen resolution via Edit – Options – Display – Screen Resolution; carefully measure the red bar and enter the measurement below it. Now View – Original Size displays the printed size. But reducing the size like this does not have the same effect as actually printing it, so it should not be used to make decisions about sharpening. I have tried viewing the screen from three times the normal viewing distance with maybe some success.) Additionally, ink spreads out a little when it hits the paper, even high-quality glossy paper. So the only way to really evaluate the sharpening of prints is to print them. Because of the reduced size and the ink bleeding, the sharpening radius, and probably the amount, must be higher than that for screen images. I recommend starting with a Size of 8 for printing at 300ppi, and 16 for 600ppi. The image will not look good on screen and you may wonder how it could possibly work; the only way to tell is to print it (or at least a small area of it). Try sharpening “test strips” with different Sizes and Intensities then printing them together to efficiently compare them.
High Pass Sharpening with PhotoLine
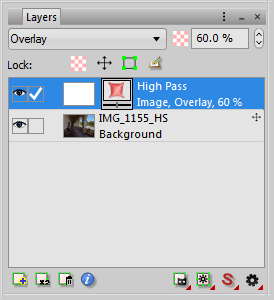
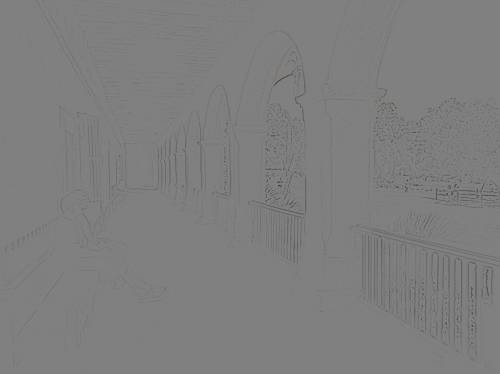
Another sharpening technique involves creating what is called a high-pass filter. The results are virtually identical to unsharp masking, but you get to see the sharpening outlines in the high-pass filter before it is applied, and some people prefer it. Start with Layer – New Adjustment Layer – High Pass. Set the size to about 4.0 and click OK. Now change the layer’s blend mode to Overlay. Adjust the layer’s opacity to vary the intensity of the effect. You can go back and adjust the high pass size as well. You can also experiment with different blend modes; Soft Light gives a milder effect, while Hard Light is stronger.
 |
 |
To control halos as described above, you need to make two copies of the image at some point because of the high-pass layer’s own blend mode. The “brute force” method is to perform high-pass sharpening as above, then duplicate the image twice (Edit – Merged Copy, Edit – Paste as Layer, repeat). Set the blend mode of one copy to Darken, the other to Lighten, and adjust the opacities of each copy as described above for Unsharp Masking layers.
A more sophisticated method of halo control is to split a high-pass layer into light and dark halves and then adjust them independently. First, create a copy of the image (Edit - Merged Copy, Edit - Paste as Layer), then create a high pass adjustment layer as above (Layer - New Adjustment Layer - High Pass); adjust Size and blend mode as you normally would. Now go back to Normal blend mode and merge the adjustment layer down into the copy of the original image (Layer - Merge Down). Rename the layer High Pass, then duplicate it (Right Click - Duplicate Layer).
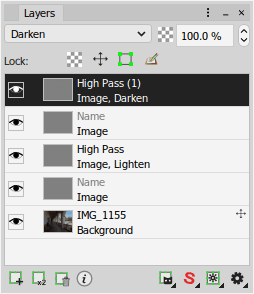
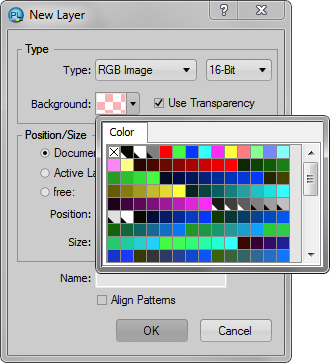
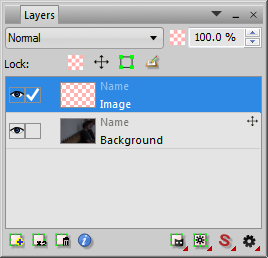
Now create two medium gray layers: Layer - New Layer, Background: gray (the fourth square in the Colors panel, or #808080), uncheck Use Transparency; then Right Click - Duplicate Layer. Move these layers so that one is below each of the High Pass layers. Then change the blend mode of one High Pass layer to Darken, the other to Lighten. The Layers panel should look like the first one below:
 |
 |
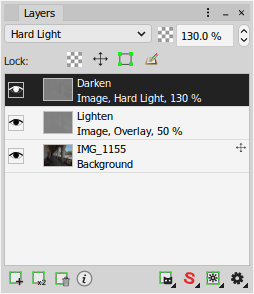 |
Merge each of the High Pass layers down into the gray layer beneath it (Layer - Merge Down). Rename the layers Darken and Lighten like the former blend modes. Now you have two high pass layers, one with the lighter pixels, one with the darker. Change the blend mode of each layer to the one chosen above when the high-pass layer was created (Overlay, Soft Light, Hard Light, etc.) Adjust the opacities of each copy as described above. You may also try different blend modes this time, such as a milder one for the Lighten layer (see the second Layers panel above).
Spotting/Retouching
Sharpening tends to enhance artifacts, which leads us to our next subject. The removal of dust spots, film scratches, and other artifacts that were not present in the actual scene is called “spotting.” When the unwanted elements were actually present, such as power lines, jet trails, cigarette butts, pimples, government ministers who have fallen from favor, this is called “retouching.” Several tools are available for these processes, and the results can border on the miraculous.
Start by creating a new transparent layer on top of the relevant image layers to hold the altered areas of the image; that way, the original image remains unaffected. Layer – New Layer; click the background color selector and choose the first little square, with the × on it and a tooltip that says “0% Opacity,” and check Use Transparency. Make this the active layer, and when using all the correction tools, choose Active & Below as the source.
 |
 |
For small, isolated spots, just dab them with the Remove Brush (under the Healing Brush). It uses a “smart” algorithm to replace the spot with what surrounds it. If the spot is near a detailed area, the results may not be predictable and the Copy Brush may work better.
The Healing Brush is a little more complicated; you need to Alt-click (Command-click) or right click a source before painting over the destination. The source pixels are blended with the destination pixels, as if to paint the texture of the source over the destination. It is called “healing” because it is especially suited to skin blemishes. But once again, if the destination is not uniform, the results may be unexpected; it performs poorly on or near edges, for example.
When all else fails, use the Copy Brush (sometimes called “clone stamp”). Again, you need to Alt-click (Command-click) or right click a source. The source is painted over the destination as-is; what you see is what you get. An important control in the Tool Settings is the Keep Distance button; when checked, the source keeps the same geographic relationship with the destination on subsequent strokes of the brush, as if following it. This is useful when painting over a long area such as a power line; the destination may be continuously painted over with a neighboring area of the sky, improving uniformity. But if new elements such as clouds or trees intervene, you need to reselect the source. When Keep Distance is unchecked, the source begins from the same origin with every brush stroke.
When correcting a complex, detailed area, or an area that crosses a sharp edge, skillful use of the Copy Brush may be the only solution. Adjust the brush size and hardness as needed. Reducing the hardness and intensity may help to make gradual changes, but it may also result in a visibly blurred result. Sometimes a realistic goal is not to completely remove an element but simply to obscure it to the point where it is not noticeable to a viewer who is not looking for it.
Roll your mouse over the image below . . . .

|
Next: raw conversion